A screenshot-backed sem.chat manual built from the real sem.chat dashboard flow. Each guide tells you what to click, what should happen after the click, how to test it, how to troubleshoot it, and what to do next.
Screenshot note: every visual in this manual was captured from the real sem.chat app using a demo workspace. Sensitive account details, customer data, API keys, payment details, and private conversation content are masked before publishing.
01
Getting Started
Create the account, finish onboarding, understand the dashboard, create the first bot, test it privately, install it, and choose the right plan.
/authSignup, free plan, and first bot
1Start with Sign Up or Sign In from the public site or app.
2Verify the email address before relying on notifications or billing messages.
3Use onboarding to create the first bot before opening the dashboard.
/overviewOverview after login
1Use quick actions to create a bot, view bots, open analytics, or manage billing.
2Review active bots, conversations, voice minutes, and satisfaction before making changes.
3Check recent activity after every setup test.
First launch
Sign up, start free, and understand the dashboard
What this is for: Use this workflow for a brand-new workspace or when onboarding a teammate who has never used sem.chat.
Before you start
Use a business email that can receive verification and billing emails.
Decide who should own the workspace before inviting the rest of the team.
Keep a safe test website or staging page ready for widget installation.
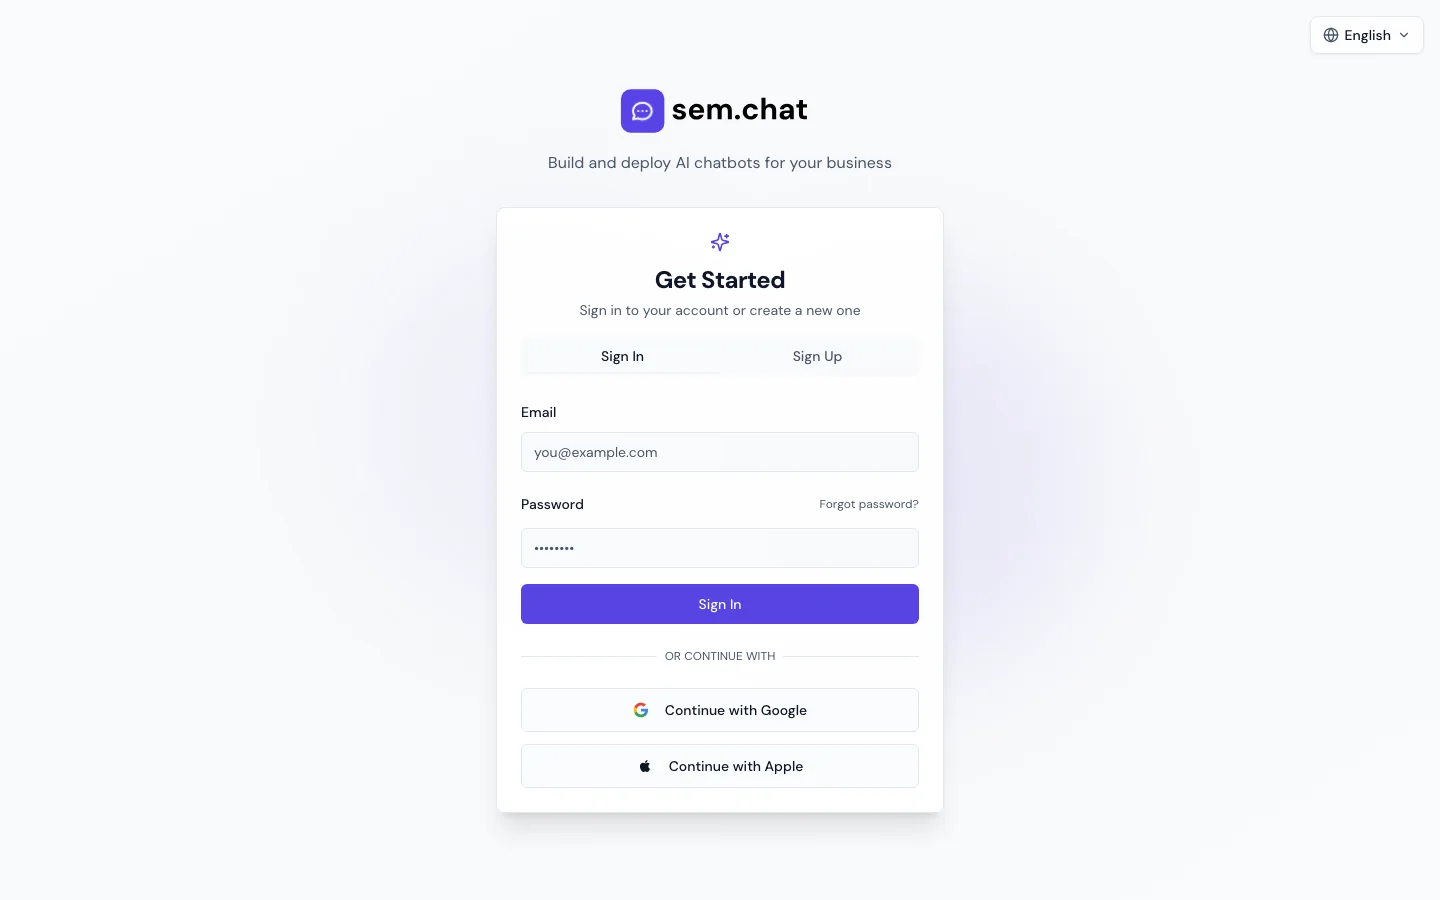
1
Open the app sign-up page
Go to app.sem.chat/auth from the website Open App button.
Expected result: The authentication page shows sign-in and account creation options.
2
Create the account
Enter the business email, create the password, and submit the sign-up form.
Expected result: The app asks for verification or moves into onboarding after the account is accepted.
3
Verify the email
Open the verification email and click the confirmation link.
Expected result: The account can receive billing, invite, report, and alert messages.
4
Complete onboarding
Enter the business name, describe the assistant goal, choose a starting color, and create the first bot.
Expected result: The workspace opens with a bot draft and an free plan state.
5
Open Overview
Click Overview in the left sidebar.
Expected result: The dashboard shows usage cards, quick actions, and recent activity.
6
Choose the next action
Use Create New Bot for setup, View All Bots for management, Analytics for performance, or Billing for plan limits.
Expected result: You know where to continue based on the state of the workspace.
How to test it: Create one private test bot and send a test message before inviting teammates. Confirm the Overview activity changes after the test.
Problem
Fix
Verification email does not arrive
Check spam, confirm the email spelling, then request another verification email.
Dashboard opens on Billing
The workspace may need an free plan or paid plan. Use the free plan or choose the correct paid plan before setup.
A teammate cannot access the workspace
Invite them from Settings, Team instead of sharing the owner login.
What to do next: Create the first bot, test it privately, then install the widget on a staging page.
Private launch test
Create the first private bot test before going live
What this is for: Use this to verify account, bot, widget, and history tracking before customers see the assistant.
Before you start
Have one sample customer question ready.
Have a staging page or local HTML test page ready.
Do not use real customer data in the first test.
1
Open My Bots
Click My Bots in the sidebar or use View All Bots from Overview.
Expected result: You can see the bot created during onboarding or an empty state with a New Bot button.
2
Open the bot builder
Click New Bot or Edit on the existing bot.
Expected result: The Bot Builder opens with Basics, Widget, Knowledge, Voice, and integration controls.
3
Save the bot once
Fill the required bot name and first message, then click Save.
Expected result: The bot receives a valid ID and can generate embed code.
4
Preview privately
Use the preview panel and ask your sample question.
Expected result: The answer should match your instructions or reveal what knowledge is missing.
5
Install on staging
Open Embed, copy the HTML snippet, and paste it before the closing body tag on the staging page.
Expected result: The widget appears in the configured corner on desktop and mobile.
6
Confirm tracking
Open Inbox or Chat History after the test conversation.
Expected result: The test conversation appears with the correct bot, channel, and message history.
How to test it: Send one text message and one voice test if voice is enabled. Confirm both appear in Chat History.
Problem
Fix
Embed code is unavailable
Save the bot first. If voice sync is still pending, wait for sync or save again after required fields are complete.
The widget shows the wrong bot
Confirm the data-bot-id in the snippet matches the bot ID from the Embed modal.
No conversation appears in history
Refresh Chat History, confirm the bot is active, and make sure the test happened on the installed widget, not a stale page.
What to do next: Move on to Bot Builder setup and knowledge training.
02
Create And Configure A Bot
Build, edit, preview, activate, transfer, or remove bots from My Bots and Bot Builder.
/dashboardMy Bots control center
1Click New Bot to start a new assistant.
2Use Edit, Embed, Transfer, Activate, or Delete on each bot card.
3Check active state and last updated time before testing.
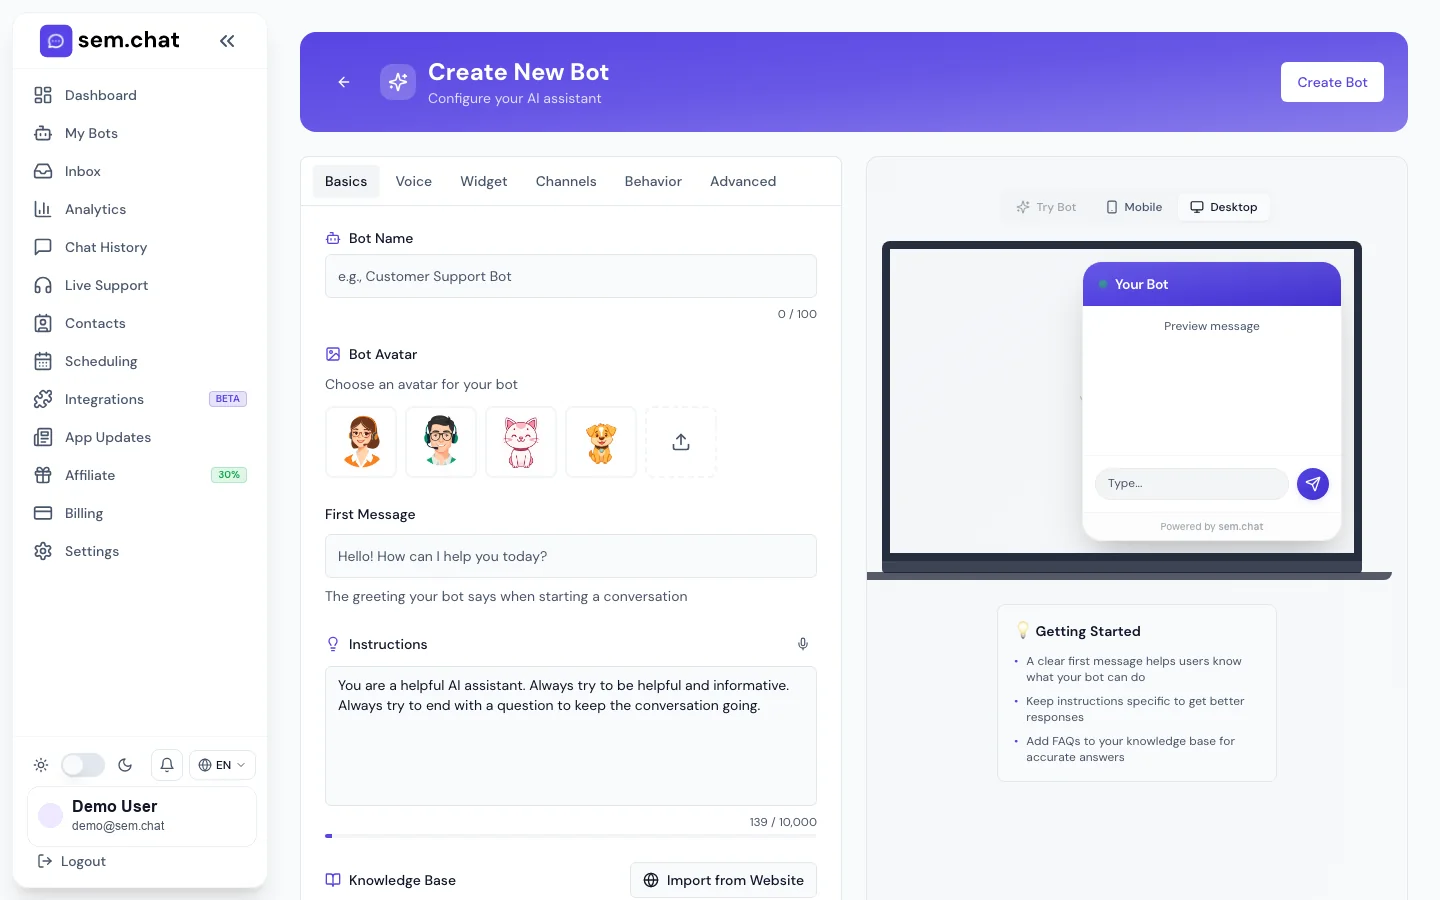
/bots/:id/editBot Builder basics tab
1Fill bot name, avatar, first message, and system instructions.
2Use Preview to test before publishing.
3Save and sync before copying embed code.
Create bot
Create a new bot from My Bots
What this is for: Use this workflow when a new brand, website, support queue, or campaign needs its own assistant.
Before you start
Prepare the bot name, goal, first message, and two or three sample questions.
Collect the public website URL if you plan to import content.
Confirm the plan allows the number of bots and voice/avatar features you need.
1
Open My Bots
Click My Bots in the sidebar.
Expected result: Existing bots and the New Bot button are visible.
2
Click New Bot
Start a new bot from the My Bots page.
Expected result: Bot Builder opens with a draft assistant.
3
Set bot identity
Enter Bot Name, upload or choose an avatar, and write the first message visitors will see.
Expected result: The preview panel reflects the assistant name, avatar, and greeting.
4
Write system instructions
Describe what the bot should do, how it should speak, what it should avoid, and when it should ask for human help.
Expected result: The assistant has clear behavior rules before knowledge is added.
5
Add basic knowledge
Paste essential company, product, support, pricing, and contact information into the knowledge area.
Expected result: The bot can answer common questions without needing website import yet.
6
Save the bot
Click Save and wait for the saved or synced confirmation.
Expected result: The bot has a stable ID, preview can be tested, and embed options become available.
7
Preview the result
Ask the prepared sample questions in Preview.
Expected result: Answers should follow the instructions and use the knowledge you entered.
8
Activate only when ready
Turn the bot active after the private test passes.
Expected result: The bot is ready for widget or channel traffic.
How to test it: Ask at least five realistic questions. Check whether the answer is correct, whether it stays on brand, and whether it asks for human help when needed.
Problem
Fix
The answer is too generic
Add more specific knowledge and rewrite instructions with examples of good answers.
The bot refuses questions it should answer
Remove overly strict instructions and add trusted knowledge for that topic.
Save does not generate embed code
Check required fields and save again after the voice provider sync finishes.
What to do next: Configure widget settings, add website knowledge, then install the bot.
Manage bots
Edit, clone workflow, transfer, deactivate, or delete a bot
What this is for: Use this workflow when a bot needs updates, ownership changes, temporary pause, or permanent removal.
Before you start
Export any conversation or contact data you must keep before deleting a bot.
Confirm the bot is not embedded on a live website before deleting or transferring it.
Tell teammates before deactivating a production bot.
1
Open My Bots
Find the bot card by name or status.
Expected result: The card shows current state and available actions.
2
Click Edit
Open the bot builder and make the required changes.
Expected result: The editor loads the current configuration.
3
Save and retest
Click Save after every material change, then run preview questions.
Expected result: The saved configuration is used by the preview and installed widget.
4
Deactivate temporarily
Use the active toggle if the bot should stop handling visitors for now.
Expected result: The bot stops serving live traffic while preserving configuration.
5
Transfer ownership
Use Transfer, enter the recipient email, and confirm.
Expected result: The selected account receives ownership according to the app transfer flow.
6
Delete only after checks
Use Delete, read the warning, and confirm only when the bot is no longer needed.
Expected result: The bot and related configuration are removed according to the warning.
How to test it: After editing, open the installed widget and ask the exact question that motivated the change. Confirm the live answer changed.
Problem
Fix
Old answer still appears
Refresh the website page, confirm you saved the correct bot, and check whether imported knowledge needs a sync.
Transfer fails
Confirm the recipient email is valid and that the destination account can accept the bot.
Delete was clicked by mistake
Stop before final confirmation. Deletion warnings exist because the action may remove bot data permanently.
What to do next: Review analytics and history after live changes to make sure visitor experience improved.
03
Install The Widget
Copy the correct embed code, install it in HTML, WordPress, React, or advanced SDK contexts, then verify desktop and mobile behavior.
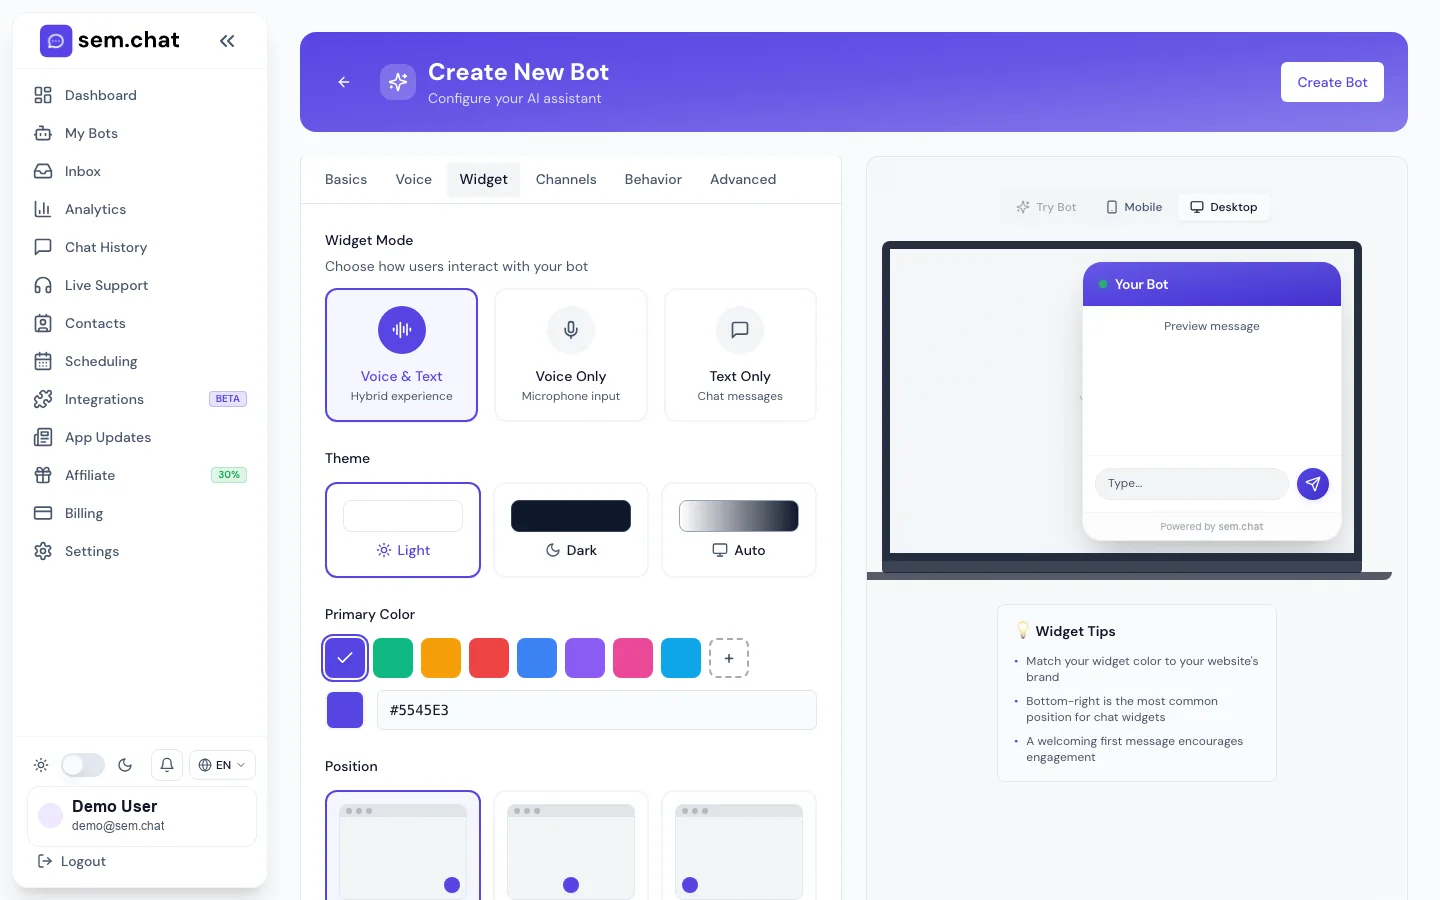
Embed modalCopy the website install snippet
1Choose HTML, WordPress, React, or NPM/SDK based on the site stack.
2Copy the code after the bot is saved and synced.
3Paste the snippet before the closing body tag or in the framework layout.
HTML install
Install the widget on a standard HTML website
What this is for: Use this when you can edit the page template, theme footer, or global HTML layout.
Before you start
Save the bot first so the embed modal has a real bot ID.
Use a staging site before production.
Keep the exact script version and data-bot-id from the modal.
1
Open My Bots
Find the bot you want to install and click Embed.
Expected result: The Embed modal opens with installation tabs.
2
Select HTML
Choose the HTML tab and click Copy Code.
Expected result: The widget script is copied with the bot ID attached.
3
Open the website template
Edit the global footer or layout file that renders on every page where the widget should appear.
Expected result: You are editing the shared site shell, not a single isolated page unless that is intentional.
4
Paste before closing body
Paste the snippet immediately before the closing body tag.
Expected result: The script loads after the page content and can mount the widget container.
5
Publish or deploy
Save the template and deploy the site.
Expected result: The widget script is live on the target pages.
6
Test desktop and mobile
Open the site in a fresh browser window and on a mobile viewport.
Expected result: The widget appears in the configured position and opens without console errors.
How to test it: Send a message from the live page, then open Inbox and Chat History to confirm the conversation belongs to the correct bot.
Problem
Fix
Widget is missing
Confirm the code is before the closing body tag, scripts are not blocked by the site builder, and the bot is active.
Wrong bot appears
Copy the snippet again and compare the data-bot-id with the desired bot.
Widget overlaps page controls
Change position or size in Widget Settings and test again on mobile.
What to do next: Tune the widget settings and lead capture after installation.
Expected result: The bot has an immediate trusted source for high-priority answers.
3
Import website content
Paste the public website URL and start the crawl/import.
Expected result: Crawl results show discovered pages or import status.
4
Review and apply results
Keep useful pages, remove irrelevant pages, then apply the selected content.
Expected result: Only approved website content enters the knowledge base.
5
Add product feed URLs
Paste Google Merchant Center or supported feed URLs and import.
Expected result: Products, prices, availability, and attributes become available to the bot.
6
Refresh or remove feeds
Use refresh when catalog data changes and remove feeds no longer used.
Expected result: The bot avoids stale or duplicate product data.
7
Save and sync
Save the bot and wait for sync to complete.
Expected result: The latest knowledge is used by preview and live widget answers.
8
Ask verification questions
Ask one test question per source you added.
Expected result: The answer cites or reflects the updated content accurately.
How to test it: Ask questions about pricing, returns, availability, company info, and unsupported topics. Confirm the bot answers known topics and does not invent unknown details.
Problem
Fix
Crawler imports irrelevant pages
Remove those pages from selected results and add clearer manual instructions.
Product prices are stale
Refresh the feed and confirm the feed URL itself contains current values.
Bot makes up answers
Add a rule that the bot should say it is not sure and offer human support when knowledge is missing.
What to do next: Return to Preview, test again, then install or update the widget.
07
Inbox, Live Support, History, Contacts
Handle daily conversations, claim live-support requests, hand control back to AI, export history, manage contacts, and sync contacts to SendPulse.
/inboxInbox conversation workflow
1Filter by bot or channel.
2Open a conversation and reply as a human when needed.
3Use translate, resolve, and handoff controls carefully.
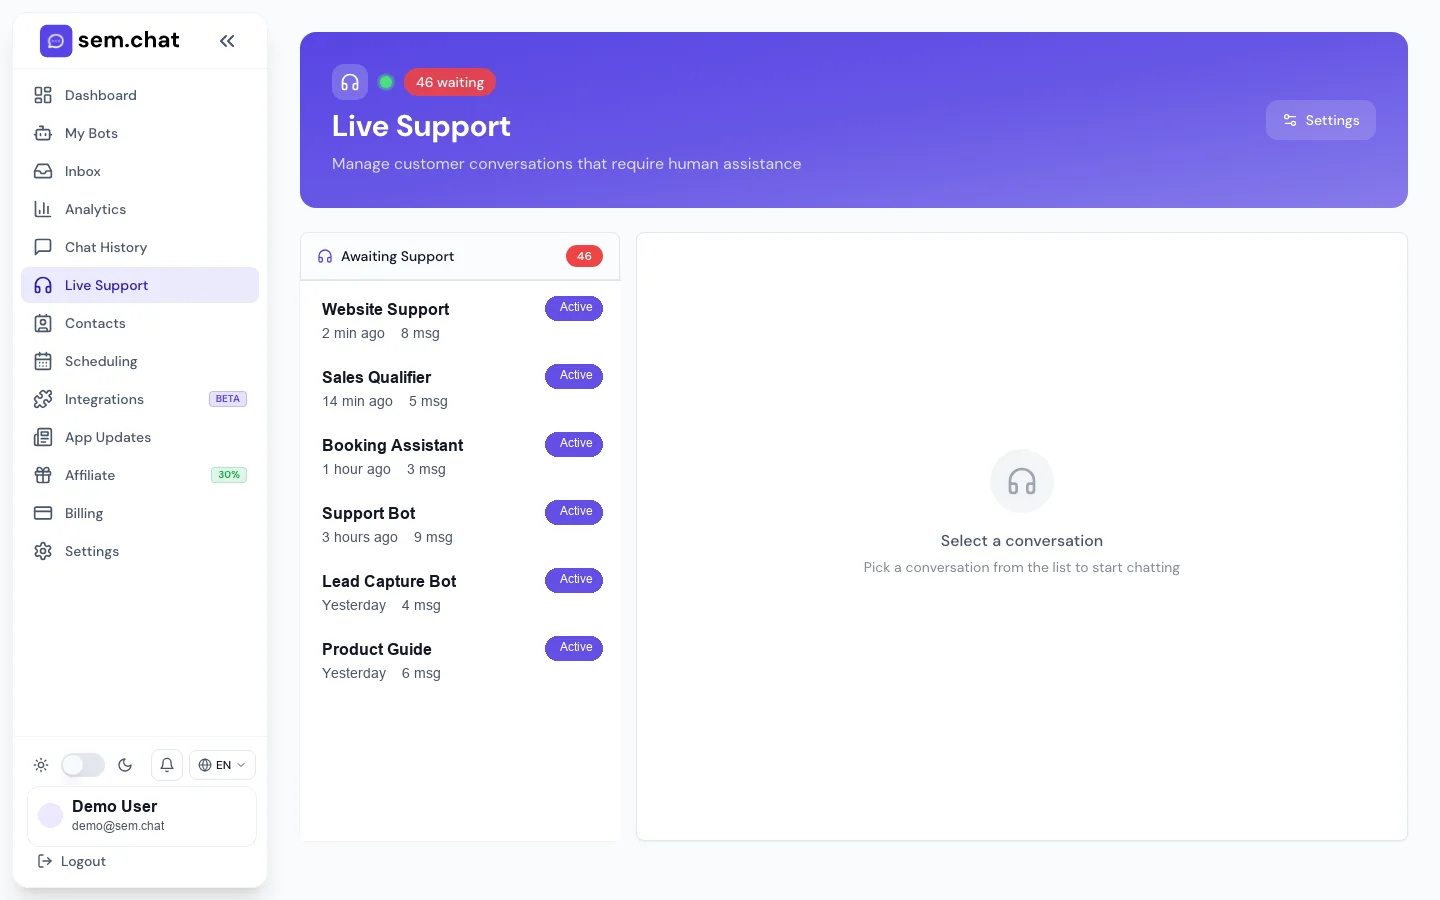
/live-supportLive-support handoff control
1Claim waiting handoffs quickly.
2Reply as an agent or hand the conversation back to AI.
3Resolve when the visitor no longer needs human help.
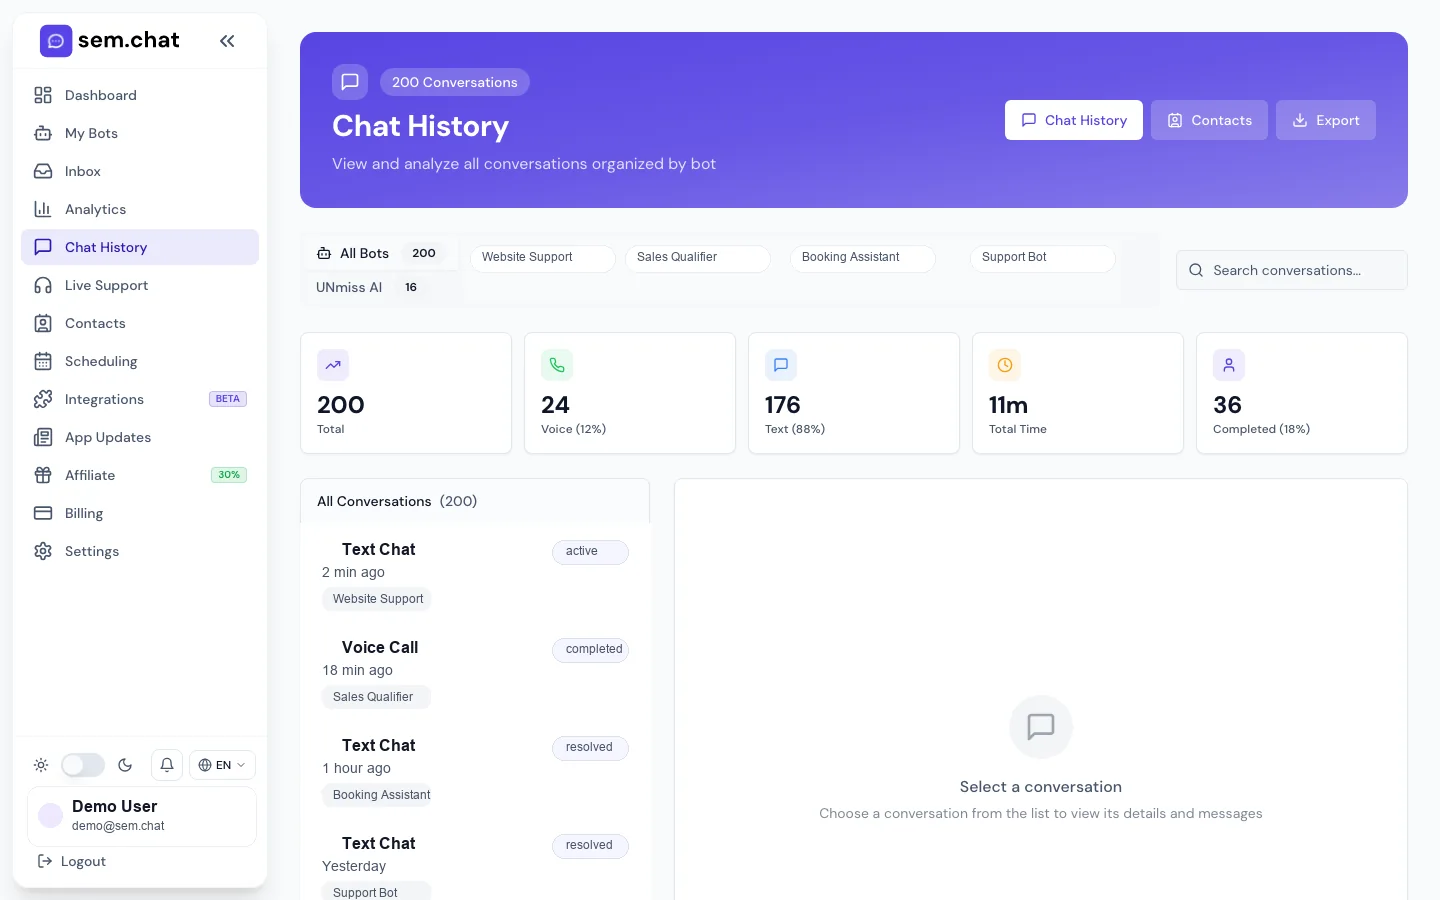
/chat-historyConversation history and exports
1Search by visitor, bot, channel, or date.
2Open full transcripts for text and voice sessions.
3Export CSV or JSON when needed.
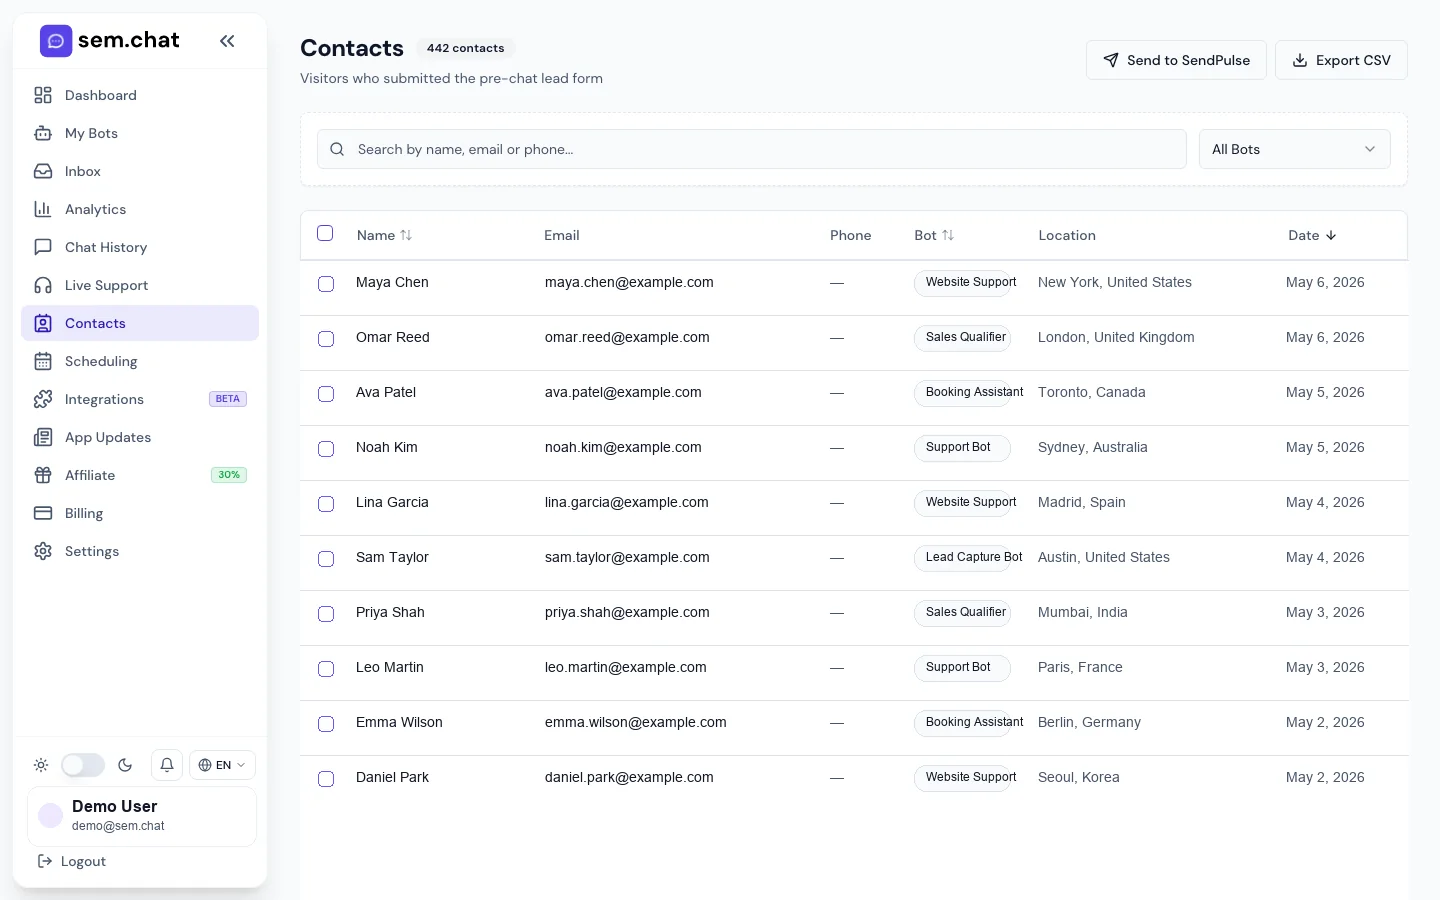
/contactsContacts and SendPulse export
1Filter contacts by bot or source.
2Open contact details and conversation context.
3Export or sync selected contacts to SendPulse.
Inbox reply
Open a conversation and send a human reply
What this is for: Use this when an operator needs to respond to a customer from sem.chat instead of letting AI continue alone.
Before you start
Confirm the operator has access to the bot or workspace.
Read the conversation before replying.
Know whether the visitor expects the same language.
1
Open Inbox
Click Inbox in the sidebar.
Expected result: Recent conversations appear with bot, channel, visitor, status, and time.
2
Filter if needed
Use channel, bot, unread, or status filters to find the conversation.
Expected result: The list narrows to the conversation set you need.
3
Open the conversation
Click the visitor row.
Expected result: The full thread, visitor info, and reply controls are visible.
4
Translate if needed
Use translation controls when the visitor language differs from the agent language.
Expected result: The agent can understand and reply appropriately.
5
Send a reply
Write the human response and send it.
Expected result: The message is added to the thread as an agent/human reply.
6
Resolve or keep open
Resolve the conversation if complete, or leave it open for follow-up.
Expected result: The inbox status matches the real customer state.
How to test it: Send a safe test reply to a test conversation and confirm it appears in the visitor widget and Chat History.
Problem
Fix
Reply fails to send
Check network state, conversation status, and whether live support has been claimed.
Visitor language is wrong
Use translation or update bot language settings before replying.
Conversation is not in Inbox
Search Chat History and confirm the widget test used the correct bot.
What to do next: Use Live Support for active handoff queues and Chat History for audits.
Live support
Claim, reply, hand back to AI, and resolve a handoff
What this is for: Use this when AI requests a human or a visitor explicitly needs an agent.
Before you start
Have an agent available before enabling live support.
Define when AI should request handoff in bot instructions.
Keep notification settings enabled for handoff alerts.
1
Open Live Support
Click Live Support in the sidebar.
Expected result: Waiting and active handoff conversations are visible.
2
Claim the request
Click Claim on the waiting conversation.
Expected result: Other agents can see the conversation is actively handled.
3
Read context
Open messages and visitor details before replying.
Expected result: The agent understands why the handoff happened.
4
Send the human reply
Respond clearly and keep the thread updated.
Expected result: The visitor receives a human response.
5
Hand back to AI if appropriate
Use hand back when the issue is answered and AI can continue.
Expected result: AI resumes handling the conversation.
6
Resolve when done
Click Resolve after the visitor no longer needs help.
Expected result: The handoff is closed and removed from the active queue.
How to test it: Create a test handoff, claim it, reply once, hand it back, and confirm the status changes in Live Support and Chat History.
Problem
Fix
Agents miss requests
Enable browser/email/push notifications and add a process for queue ownership.
AI keeps taking over too soon
Adjust instructions and handoff rules so human control stays active until resolved or handed back.
External CRM is out of sync
Use webhooks or polling from the Developer Recipes section.
What to do next: Connect CRM/webhooks if support teams work outside sem.chat.
History and contacts
Search, export, and use conversation/contact records
What this is for: Use this for audits, lead review, CSV export, and SendPulse syncing.
Before you start
Decide whether you need conversations, contacts, or both.
Apply the correct date range before exporting.
Do not export more personal data than needed.
1
Open Chat History
Click Chat History in the sidebar.
Expected result: Conversation filters, stats, and the transcript list are visible.
2
Search and filter
Filter by bot, channel, mode, visitor, or date range.
Expected result: Only matching conversations remain visible.
3
Open a transcript
Click a conversation to read the full message thread.
Expected result: The full context, contact details, and conversation metadata are visible.
4
Export conversations
Click Export and choose the required format if available.
Expected result: The export contains the filtered conversation data.
5
Open Contacts
Click Contacts in the sidebar.
Expected result: Lead/contact records appear with source, bot, and status.
6
Filter and export contacts
Search contacts, select the desired records, then export or sync to SendPulse.
Expected result: The selected contacts are available outside sem.chat according to the chosen action.
How to test it: Export a small filtered CSV and open it locally to confirm columns and date range are correct.
Problem
Fix
Contact missing from Contacts
Confirm lead capture is enabled and the visitor submitted the form.
Export is too large
Narrow the date range or bot filter before exporting.
SendPulse sync unavailable
Connect SendPulse in Integrations first, then return to Contacts.
What to do next: Review Analytics to understand performance trends after operations are running.
08
Channels And Integrations
Connect Slack, Facebook, Instagram, WhatsApp, Telegram through BotFather, manual credentials, alternative chat links, SendPulse, and CRM integrations.
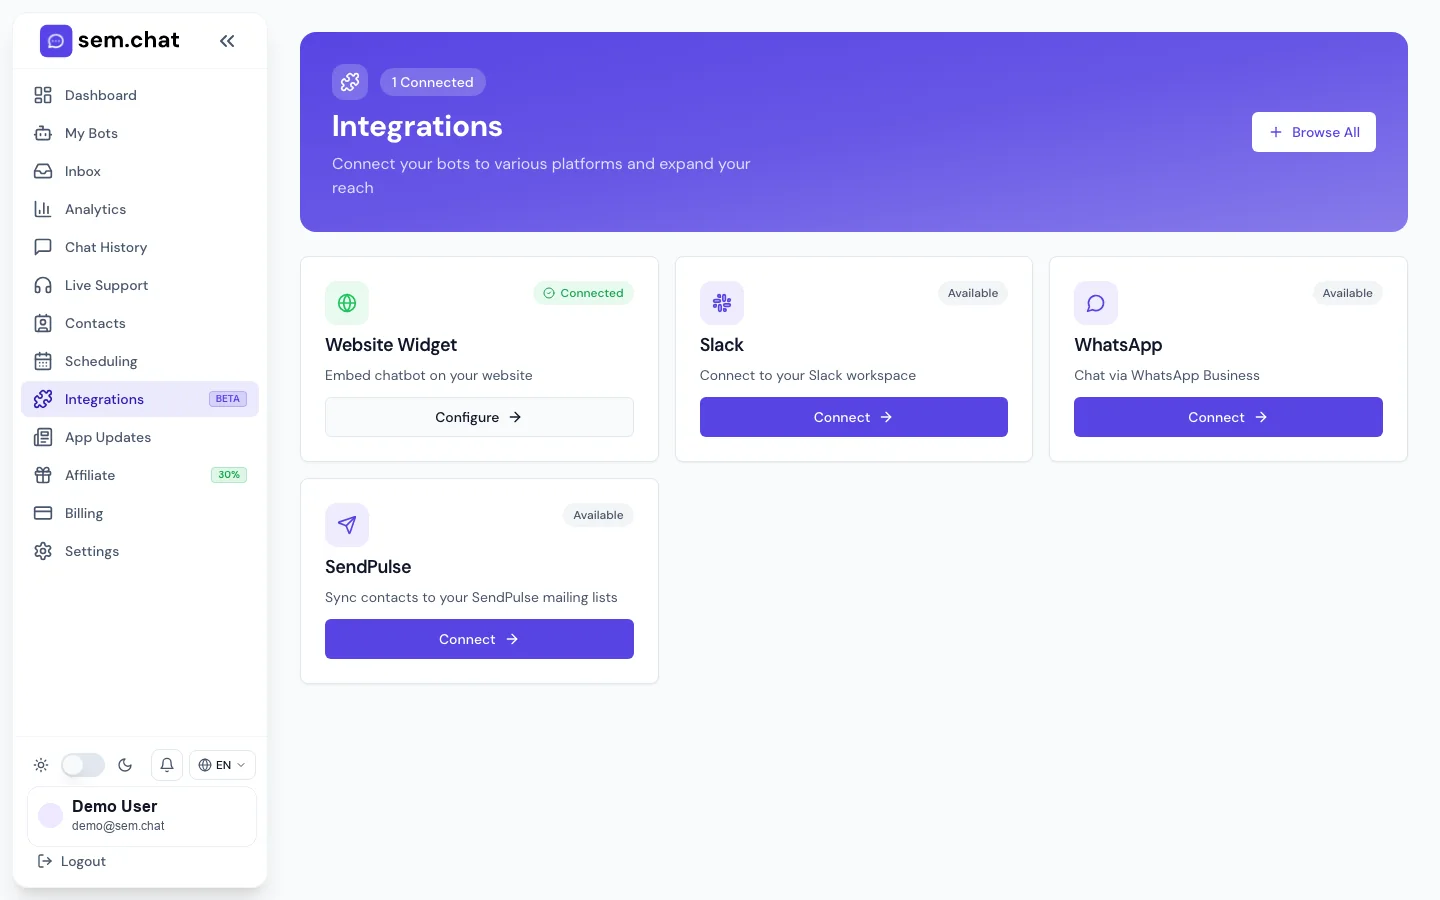
/integrationsChannels, CRM, and email connections
1Choose the channel or CRM integration card.
2Follow OAuth or credential steps for each provider.
3Disconnect or retest integrations from the same page.
Connect channels
Connect a messaging channel or CRM integration
What this is for: Use this when sem.chat should receive conversations outside the website widget or send contacts to other tools.
Before you start
Have admin access to the external platform.
Know which bot should receive channel messages.
Use test channels before connecting production accounts.
1
Open Integrations
Click Integrations in the sidebar.
Expected result: Available channels, CRM tools, SendPulse, and website widget options are visible.
2
Choose the integration
Click Connect on Slack, Meta channels, Telegram, SendPulse, CRM, or manual credentials.
Expected result: The setup dialog or OAuth flow opens.
3
Complete provider setup
For OAuth channels, approve the requested permissions. For manual channels, paste the required token, secret, account ID, or webhook URL.
Expected result: sem.chat stores the connection and shows the integration as connected.
4
Assign the bot
Choose which bot should handle messages from that channel when the dialog asks.
Expected result: Incoming messages route to the correct assistant.
5
Test the channel
Send a test message from the external channel.
Expected result: The message appears in Inbox or Chat History under the correct channel.
6
Disconnect if needed
Use Disconnect from the integration card when the channel should stop.
Expected result: sem.chat stops receiving or sending through that integration.
How to test it: Send one test message through the connected channel and confirm the bot reply, Inbox row, and history record.
Problem
Fix
Telegram token fails
Create or reset the token in BotFather and paste it again.
Copy the event link, open it in a private window, choose a slot, and complete a test booking.
Expected result: The booking appears in the Bookings tab and confirmation messages are sent.
How to test it: Complete one test booking, one reschedule, and one cancellation. Confirm each event appears in Scheduling and connected calendars.
Problem
Fix
No times appear on public page
Check timezone, weekly availability, date overrides, notice window, and connected calendar conflicts.
Booking email missing
Check email settings and spam folder, then send another test booking.
Payment fails on paid event
Confirm billing/payment integration settings and currency are valid before publishing.
What to do next: Embed booking links in the bot, website, or follow-up emails.
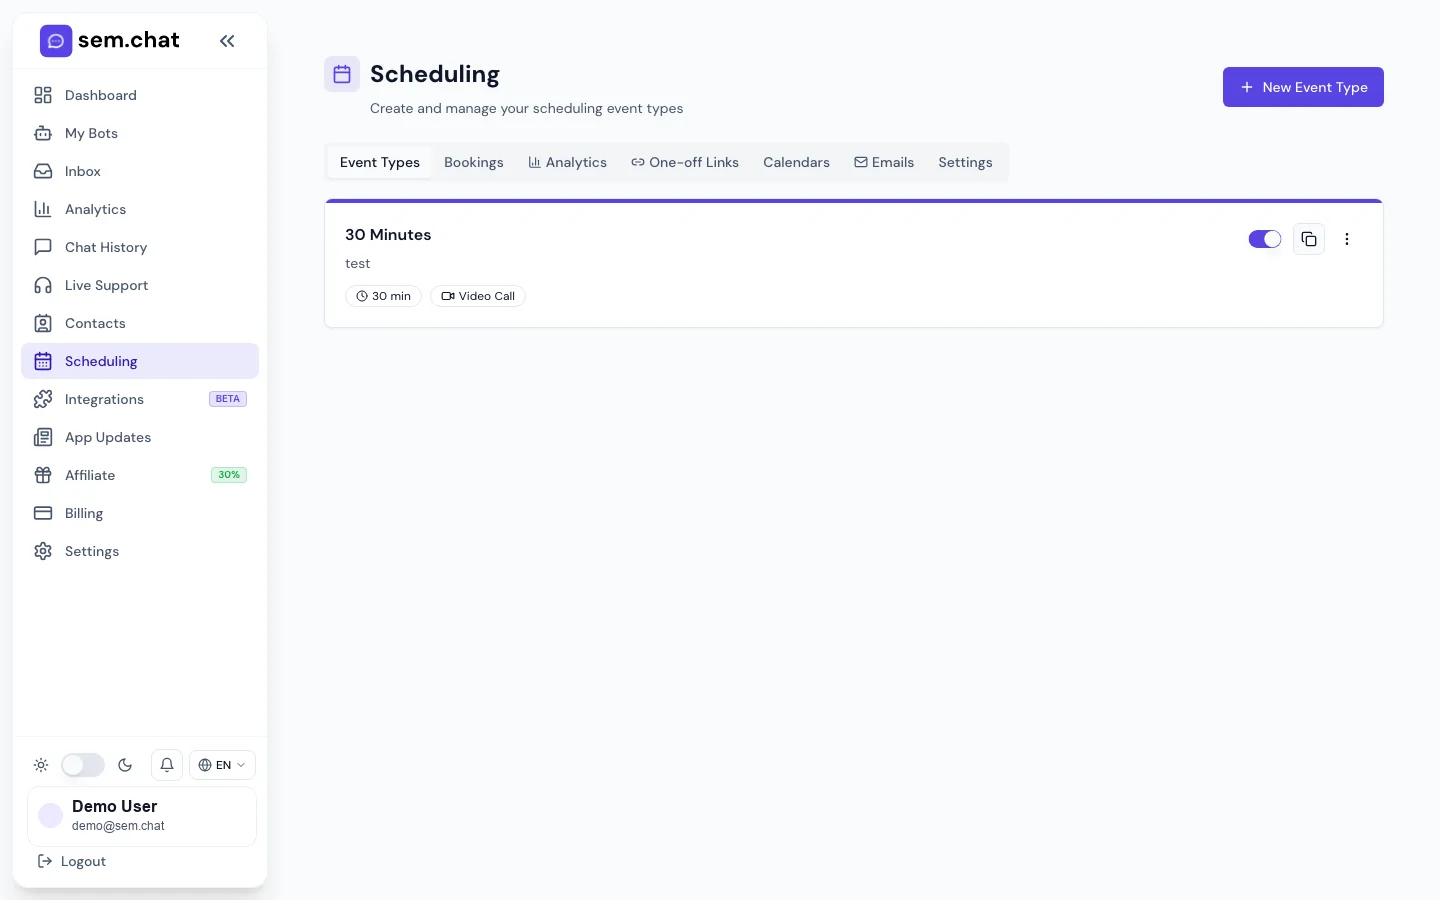
Advanced scheduling
Use one-off links, analytics, embeds, and paid events
What this is for: Use this when scheduling needs temporary availability, reporting, embedded booking, or payment.
Before you start
Create at least one event type first.
Connect calendars before using one-off links heavily.
Define refund/cancellation policy before enabling paid events.
1
Create a one-off link
Open One-off Links, select the offered slots or rules, then generate the link.
Expected result: The recipient can book from only the selected availability.
2
Embed scheduling
Use the event card embed option if the booking flow should appear on your website.
Expected result: The booking UI can be placed in the page where visitors convert.
3
Review scheduling analytics
Open Analytics inside Scheduling.
Expected result: You can see bookings, completion trends, and event-type performance.
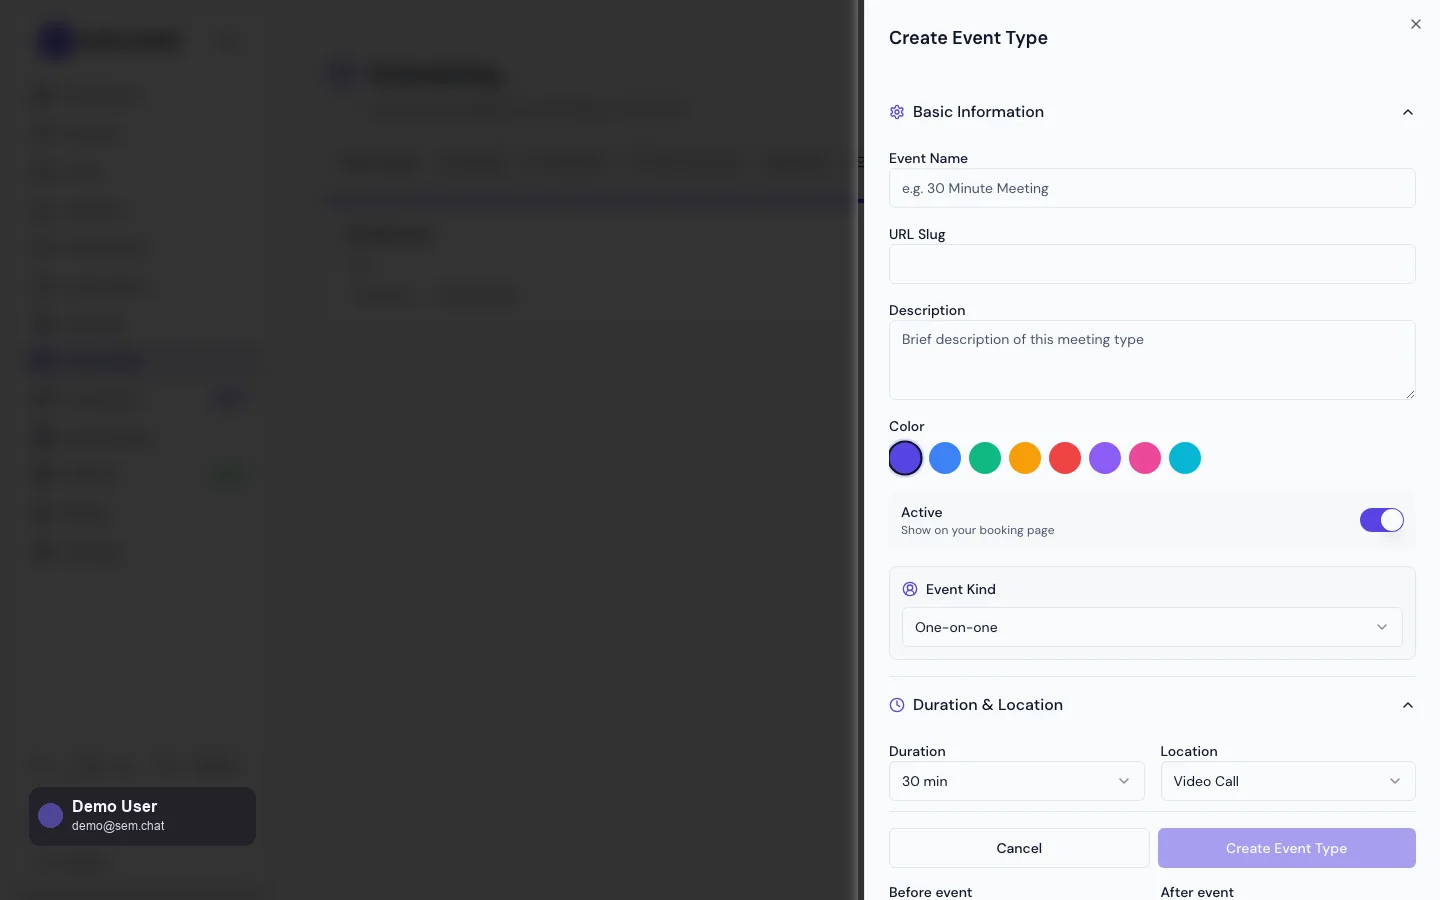
4
Enable paid events
Open the event editor, set price, currency, and payment behavior.
Expected result: Visitors must complete the payment step according to the event setup.
5
Audit bookings
Open Bookings and review upcoming, completed, canceled, and rescheduled entries.
Expected result: The team can manage attendance and follow-up.
How to test it: Book through the public page and through an embedded page if used. Confirm both create the same type of booking record.
Problem
Fix
One-off link exposes wrong slots
Regenerate the link with a smaller slot set or stricter date range.
Embedded booking is too narrow
Place the embed in a wider content container and check mobile layout.
Analytics look empty
Create or wait for real bookings; analytics depend on booking records.
What to do next: Connect scheduling outcomes to Reports and Analytics.
10
Analytics And Reports
Pick date ranges, use custom dates, read core metrics, export CSV, review satisfaction and conversation trends, configure email reports, and verify delivery.
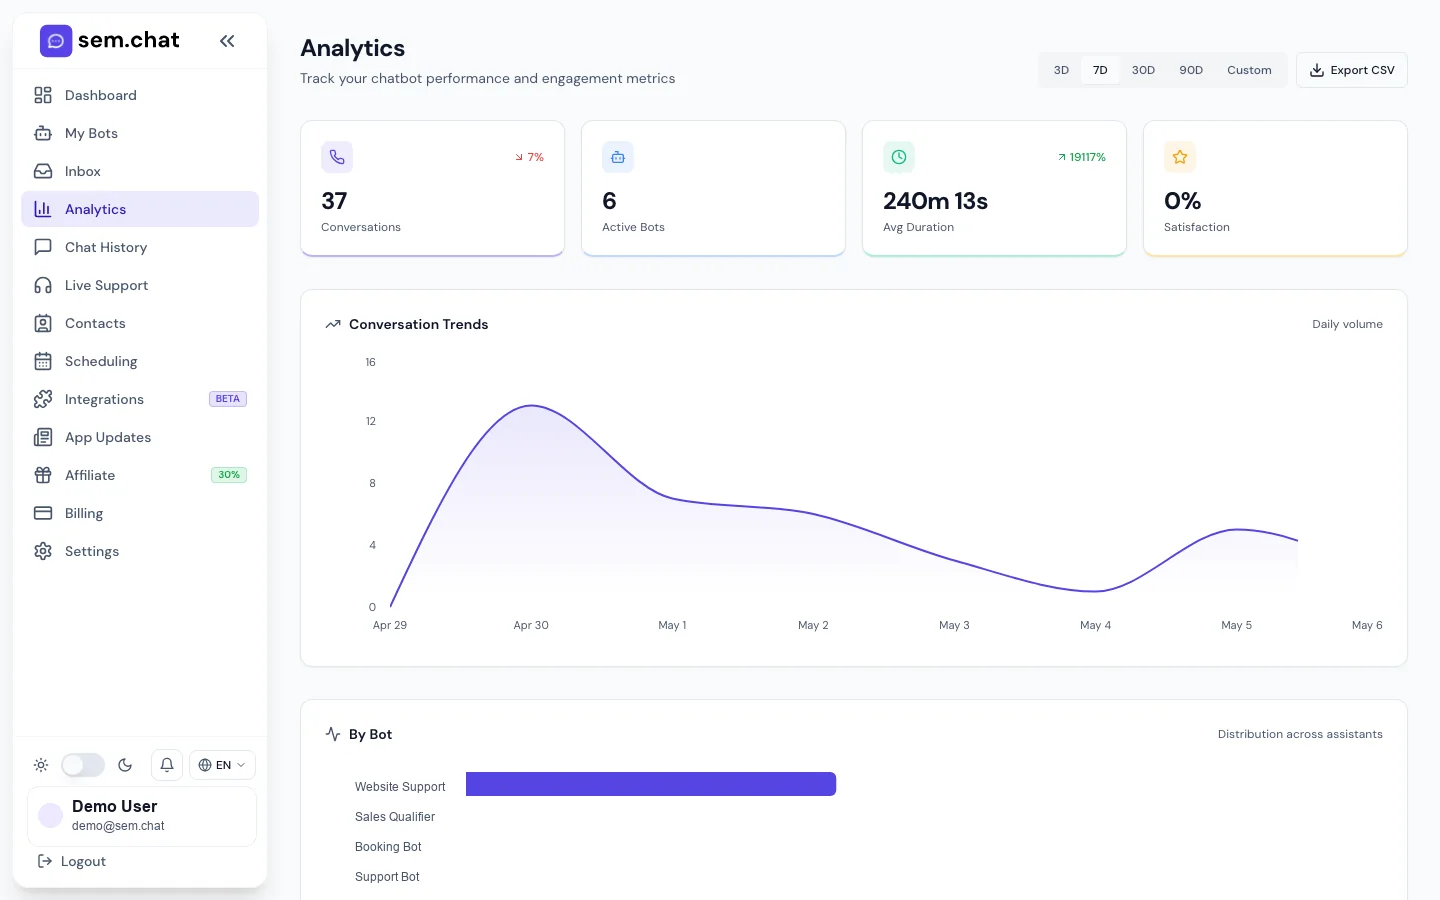
/analyticsAnalytics dashboard
1Choose date ranges or custom dates.
2Read conversation, satisfaction, language, channel, and conversion metrics.
3Export CSV for offline analysis.
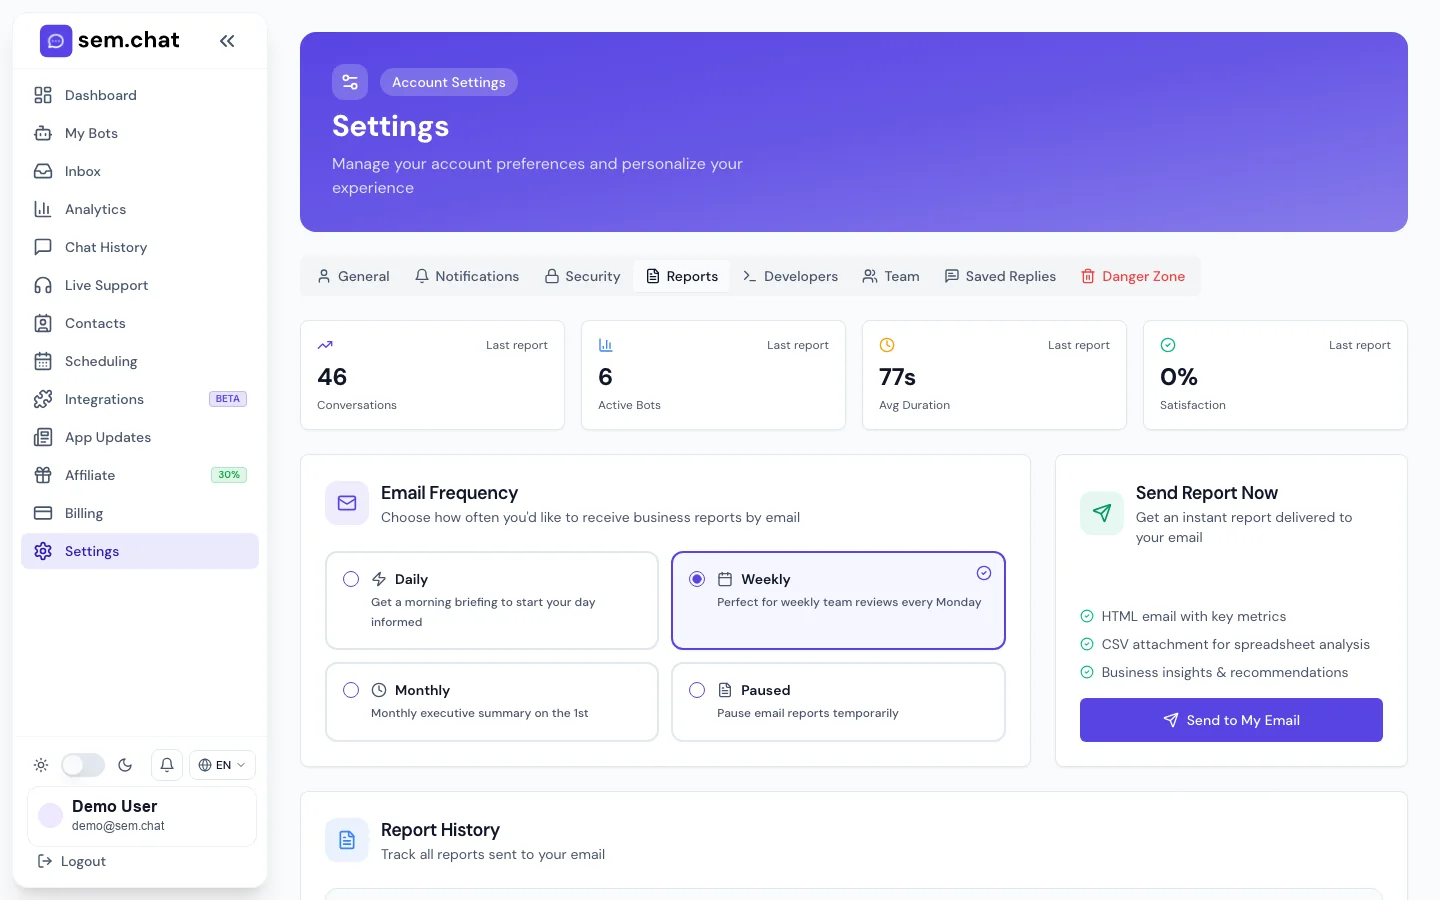
Settings / ReportsEmail report setup
1Choose daily, weekly, or monthly report cadence.
2Add report recipients.
3Send an instant report to test delivery.
Analytics review
Read analytics and export performance data
What this is for: Use this for weekly reviews, launch checks, support quality review, and conversion analysis.
Before you start
Choose the date range before reading metrics.
Know which bot or channel you are evaluating.
Exclude private test dates when reporting production performance.
1
Open Analytics
Click Analytics in the sidebar.
Expected result: Dashboard metrics and chart panels are visible.
2
Choose date range
Select today, 7 days, 30 days, or custom dates.
Expected result: All charts update to the selected period.
3
Read core metrics
Review conversations, voice minutes, satisfaction, conversion, and channel mix.
Expected result: You understand the volume and quality of customer interactions.
4
Review trends
Look at conversation trends, satisfaction changes, top questions, and language/channel patterns.
Expected result: You can identify where to improve bot instructions or staffing.
5
Export CSV
Use Export CSV when the team needs spreadsheet analysis.
Expected result: The CSV contains the selected date range and metrics.
6
Turn findings into changes
Update bot instructions, knowledge, widget settings, or support coverage based on the data.
Expected result: Analytics lead to concrete product improvements.
How to test it: Export a small custom-date CSV and verify the date range and metrics match what the dashboard shows.
Problem
Fix
Metrics seem too high
Check whether staging/test conversations are included in the selected date range.
Satisfaction is empty
Enable ratings in Widget Settings and wait for visitors to leave ratings.
Voice minutes do not match expectations
Confirm voice mode is enabled only on the intended bots.
What to do next: Schedule email reports for recurring visibility.
Reports
Configure recurring email reports and test delivery
What this is for: Use this when owners, managers, or clients need automatic performance summaries.
Before you start
Decide who should receive reports.
Use verified email addresses.
Pick a cadence that matches business review rhythms.
1
Open Settings, then Reports
Go to Settings and select the Reports tab, or use the Reports redirect if available.
Expected result: Report cadence, recipients, and history are visible.
2
Choose cadence
Enable daily, weekly, or monthly reports.
Expected result: The report schedule is stored for the workspace.
3
Add recipients
Enter the email addresses that should receive reports.
Expected result: Reports are sent to the correct stakeholders.
4
Send instant report
Click Send Now or equivalent instant report action.
Expected result: A report email is sent immediately for verification.
5
Review report history
Check the history panel after reports are sent.
Expected result: You can confirm delivery status and timing.
How to test it: Send an instant report to a test recipient and confirm receipt and formatting.
Problem
Fix
Report email does not arrive
Check recipient spelling, spam folder, and report history status.
Wrong people receive reports
Update recipients and save before the next scheduled send.
Report content feels noisy
Adjust date range expectations and use Analytics for deeper manual review.
What to do next: Use the report cadence as an operating rhythm for bot improvements.
11
Billing, Team, Security, Settings, Affiliate
Start or upgrade plans, manage billing portal, invite teammates, set roles, edit profile/language, configure notifications, enable 2FA, use danger-zone actions, and run the affiliate workflow.
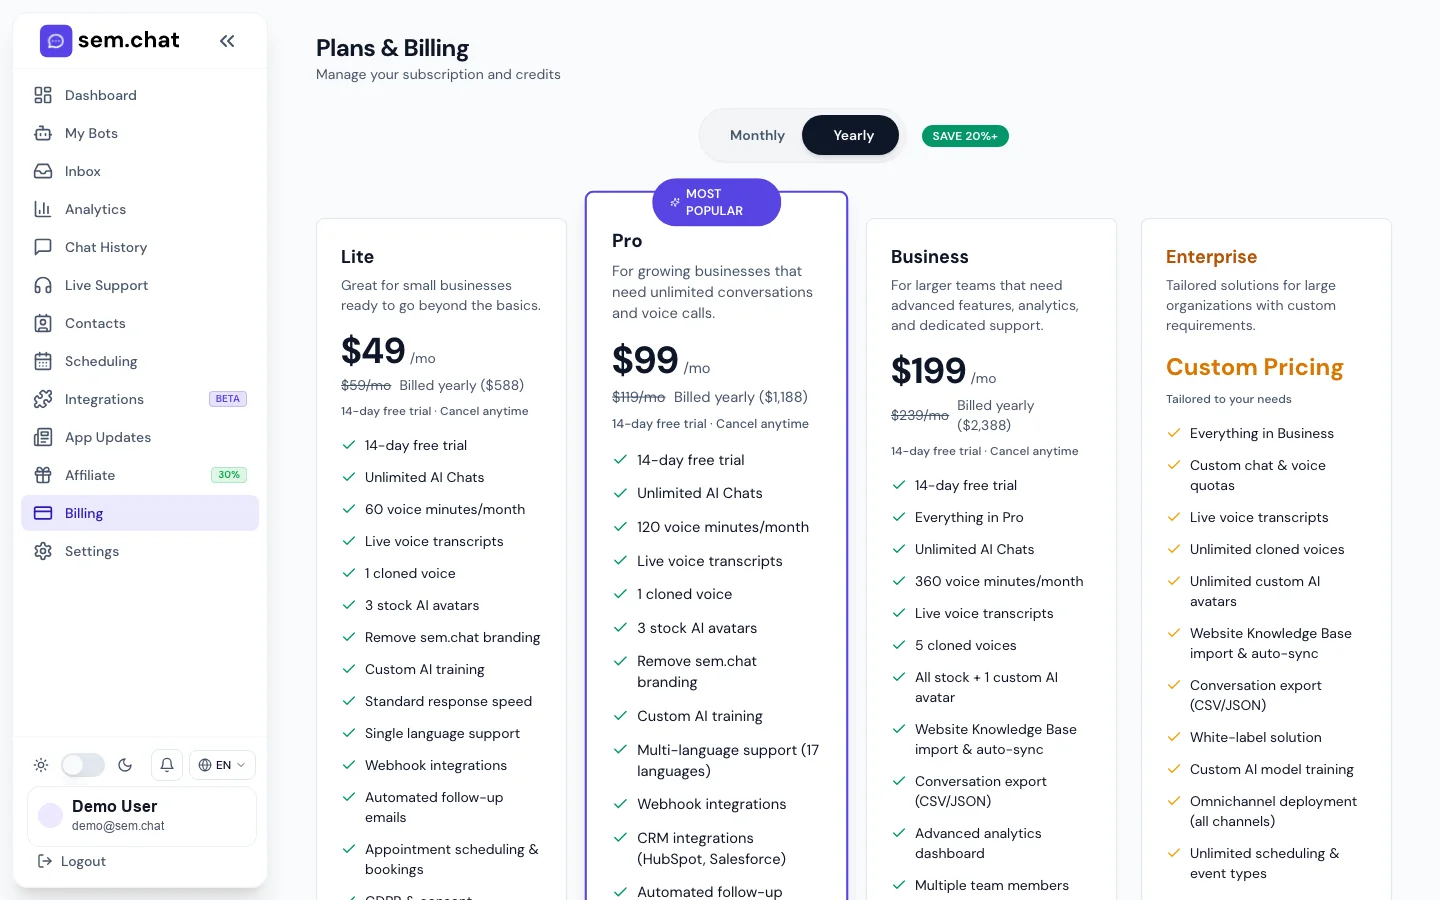
/billingPlan and billing controls
1Review current plan, current plan, and usage limits.
2Compare plan features before upgrading.
3Open the billing portal for invoices, payment methods, cancellation, or reactivation.
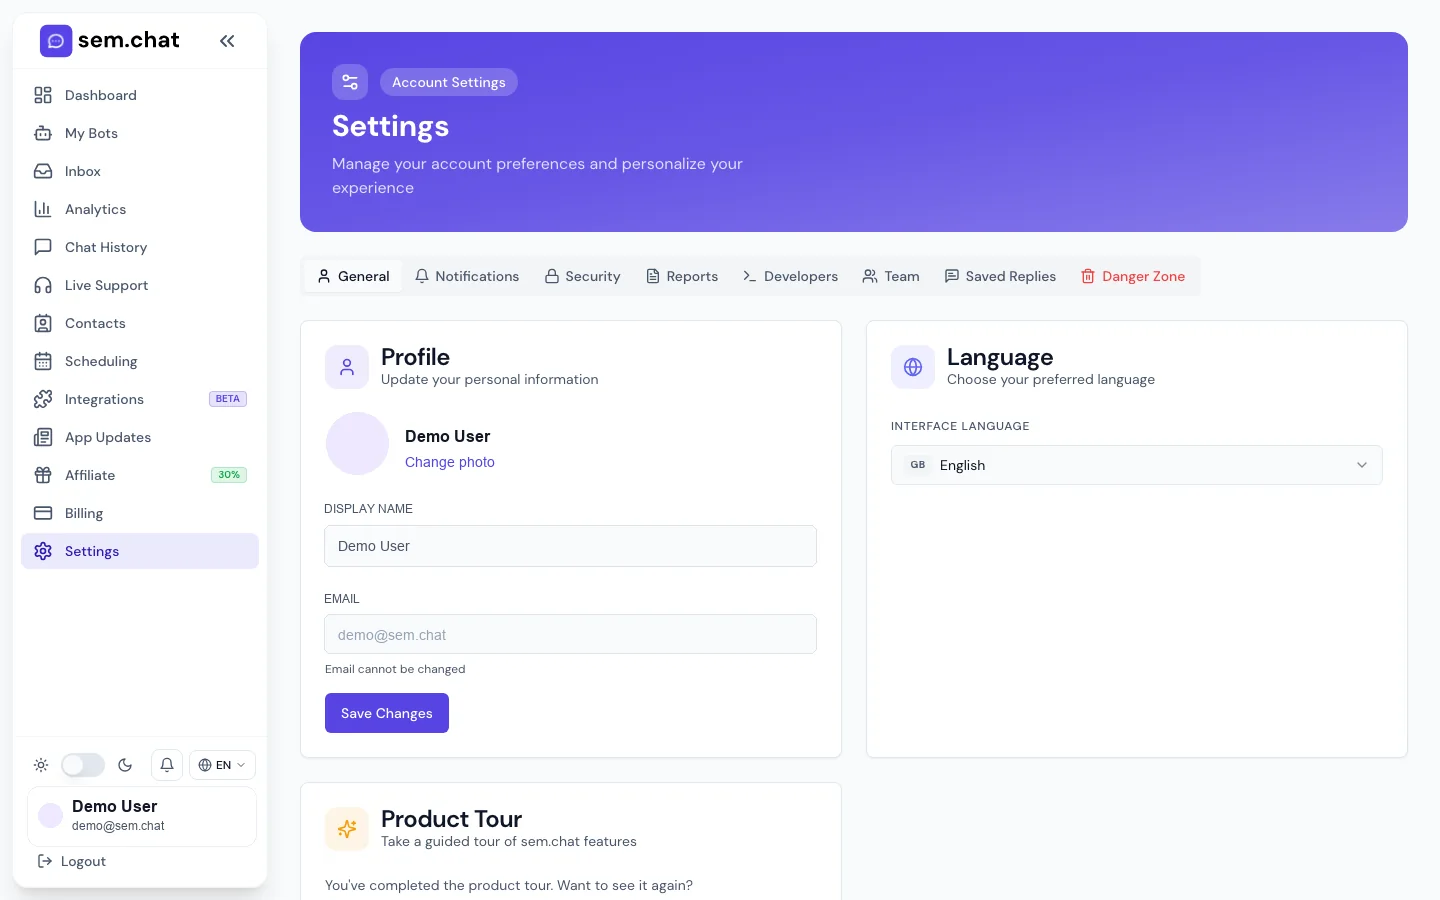
/settingsSettings, team, and security
1Use General for profile and language.
2Use Team for invites and roles.
3Use Security for 2FA, API keys, and danger-zone actions.
/affiliateAffiliate program controls
1Join the program to create a referral link.
2Copy the referral link for campaigns.
3Set payout email and request eligible payouts.
Billing
Start, upgrade, cancel, or reactivate a plan
What this is for: Use this when the workspace needs plan access, more limits, invoices, payment updates, or subscription changes.
Before you start
The account owner or billing admin should perform billing actions.
Confirm which features are plan-gated: voice, cloned voices, custom avatars, API, team, CRM, and channels.
Use the secure billing portal for payment method and invoice changes.
1
Open Billing
Click Billing in the sidebar.
Expected result: Current plan, current plan, usage limits, and plan cards are visible.
2
Compare plans
Review chat, voice, team, API, avatar, integration, scheduling, and support limits.
Expected result: You know which plan unlocks the needed feature.
3
Choose billing interval
Select monthly or yearly if the toggle is available.
Expected result: Pricing and savings update for the selected interval.
4
Upgrade or start checkout
Choose the desired plan and complete checkout.
Expected result: The subscription becomes active after payment confirmation.
5
Open customer portal
Use the billing portal for payment method, invoices, cancellation, or reactivation.
Expected result: Sensitive billing actions happen in the secure provider portal.
6
Verify feature access
Return to the feature that was locked and reload the app.
Expected result: The unlocked feature is now available if the plan includes it.
How to test it: After upgrading, open the previously locked feature, such as voice clone or API keys, and confirm the lock is gone.
Problem
Fix
Feature remains locked after upgrade
Refresh the app, wait a moment for subscription sync, then check Billing again.
Checkout was cancelled
Return to Billing and start checkout again; no plan changes happen after a cancelled checkout.
Need invoice or card change
Open the customer portal instead of editing payment details inside the app.
What to do next: Invite teammates and secure the owner account.
Team and security
Invite teammates, set roles, edit profile, enable 2FA, and manage settings
What this is for: Use this when the workspace moves from solo setup to team operation.
Before you start
Know each teammate role before sending invites.
Use least-privilege access: Owner, Admin, Editor, Viewer.
Have an authenticator app ready for 2FA.
1
Open Settings
Click Settings in the sidebar.
Expected result: General, notifications, team, reports, developers, security, and related tabs are visible.
2
Edit profile and language
Update display name, profile information, and preferred language in General.
Expected result: The app identifies the user correctly and uses the chosen language where available.
3
Invite team members
Open Team, enter an email, choose a role, and send the invite.
Expected result: The teammate receives an invite link and appears as pending until accepted.
4
Set role permissions
Use Owner for full control, Admin for management, Editor for content changes, and Viewer for read-only access.
Expected result: Each user has access appropriate to their responsibility.
5
Configure notifications
Choose email, browser, push, live-support, billing, and report notifications.
Expected result: The right people get alerts without unnecessary noise.
6
Enable 2FA
Open Security, enable two-factor authentication, scan the code, and store recovery details.
Expected result: The account requires a second factor after password login.
7
Use danger-zone actions carefully
Export needed data and confirm active widgets/integrations before destructive account actions.
Expected result: The workspace avoids accidental data loss.
How to test it: Invite a test teammate, accept the invite in a separate browser, and confirm the role only exposes intended features.
Problem
Fix
Invite email missing
Check spam, resend the invite, and verify the address.
Teammate sees too much
Lower their role and review bot access settings.
2FA setup fails
Check device time, rescan the QR code, and store recovery details before relying on it.
What to do next: Configure API keys only for users and services that need them.
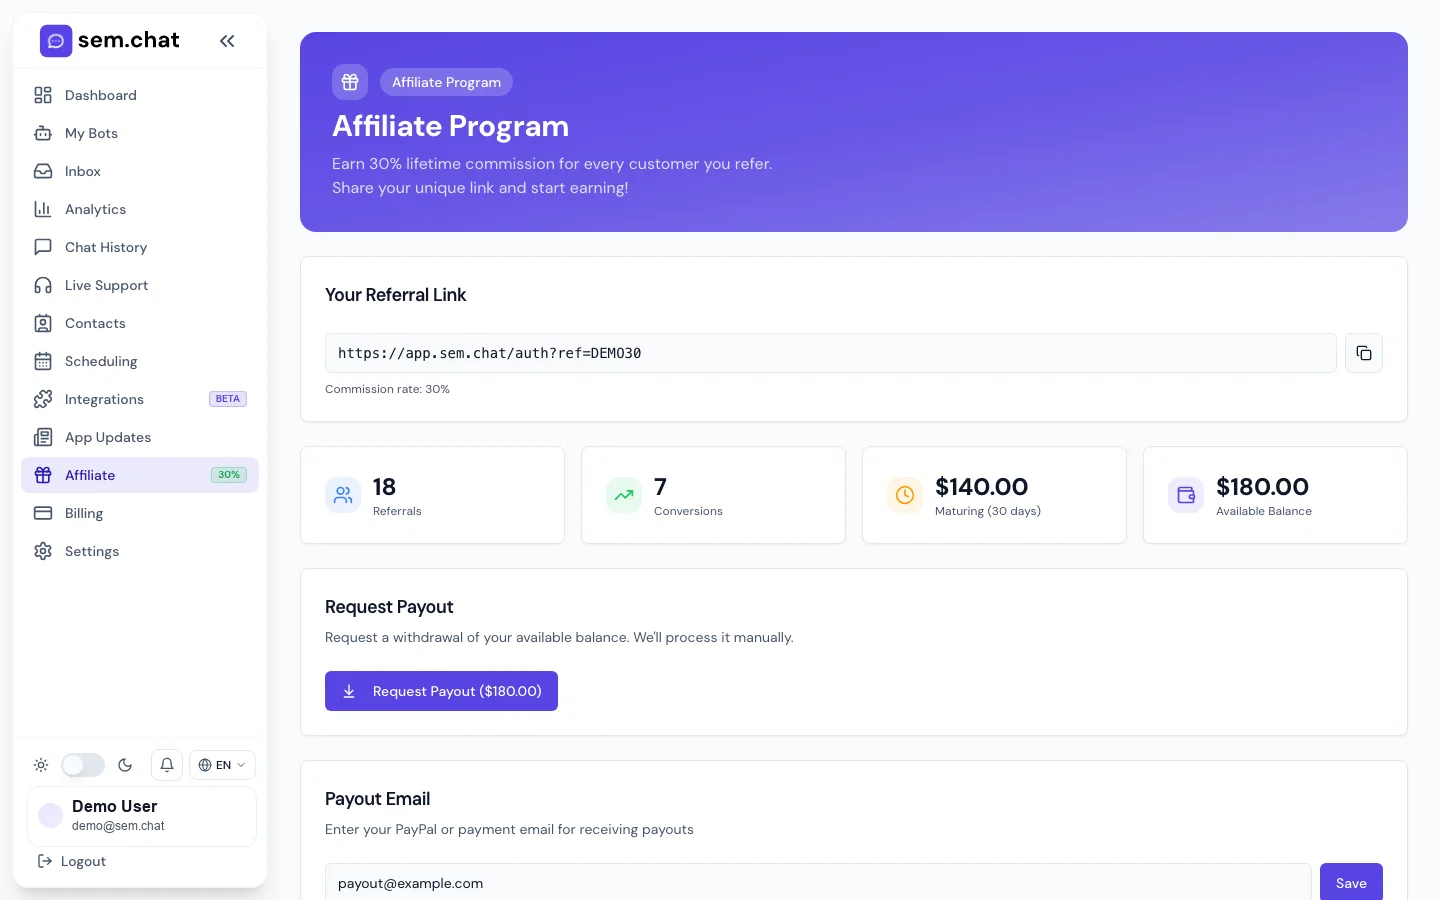
Affiliate
Join affiliate, copy referral link, set payout email, and request payout
What this is for: Use this when a partner or customer wants to refer new sem.chat users and track commission activity.
Before you start
Use the account that should own referral attribution.
Prepare the payout email before requesting payout.
Check program rules before publishing referral campaigns.
1
Open Affiliate
Click Affiliate in the sidebar or open the affiliate tab from Settings if linked there.
Expected result: The affiliate program page shows join, referral, payout, and history areas.
2
Join the program
Click Join if the account has not joined yet.
Expected result: A referral code and referral link are created.
3
Copy referral link
Copy the unique link and use it in content, campaigns, or partner messages.
Expected result: Sign-ups through the link can be attributed to the affiliate account.
4
Set payout email
Enter the payout email and save it.
Expected result: Eligible payouts can be routed correctly.
5
Review referrals and commissions
Check referral list, commission status, and payout history.
Expected result: You know what is pending, eligible, or already paid.
6
Request payout
Click Request Payout when the program rules and minimums are met.
Expected result: The payout request is recorded for processing.
How to test it: Open the referral link in a private browser and confirm it lands on the expected signup flow with referral tracking.
Problem
Fix
Referral link is missing
Join the program first or refresh the affiliate page after joining.
Payout request unavailable
Check minimum payout threshold, eligible commission state, and payout email.
Referral not attributed
Confirm the visitor used the exact referral link and did not strip tracking parameters.
What to do next: Use Analytics and Reports to monitor referred customer impact if applicable.
12
Notifications And App Updates
Review alerts, mark notifications read, filter important events, and use app updates to understand new product changes.
/notificationsNotification center
1Use Mark all read after reviewing unread alerts.
2Filter by unread, billing, live support, or system events.
3Open the related feature after reading the alert.
/app-updatesApp updates feed
1Read release notes for new features and fixes.
2Use details to train teammates before workflow changes.
3Check updates after noticing UI or behavior changes.
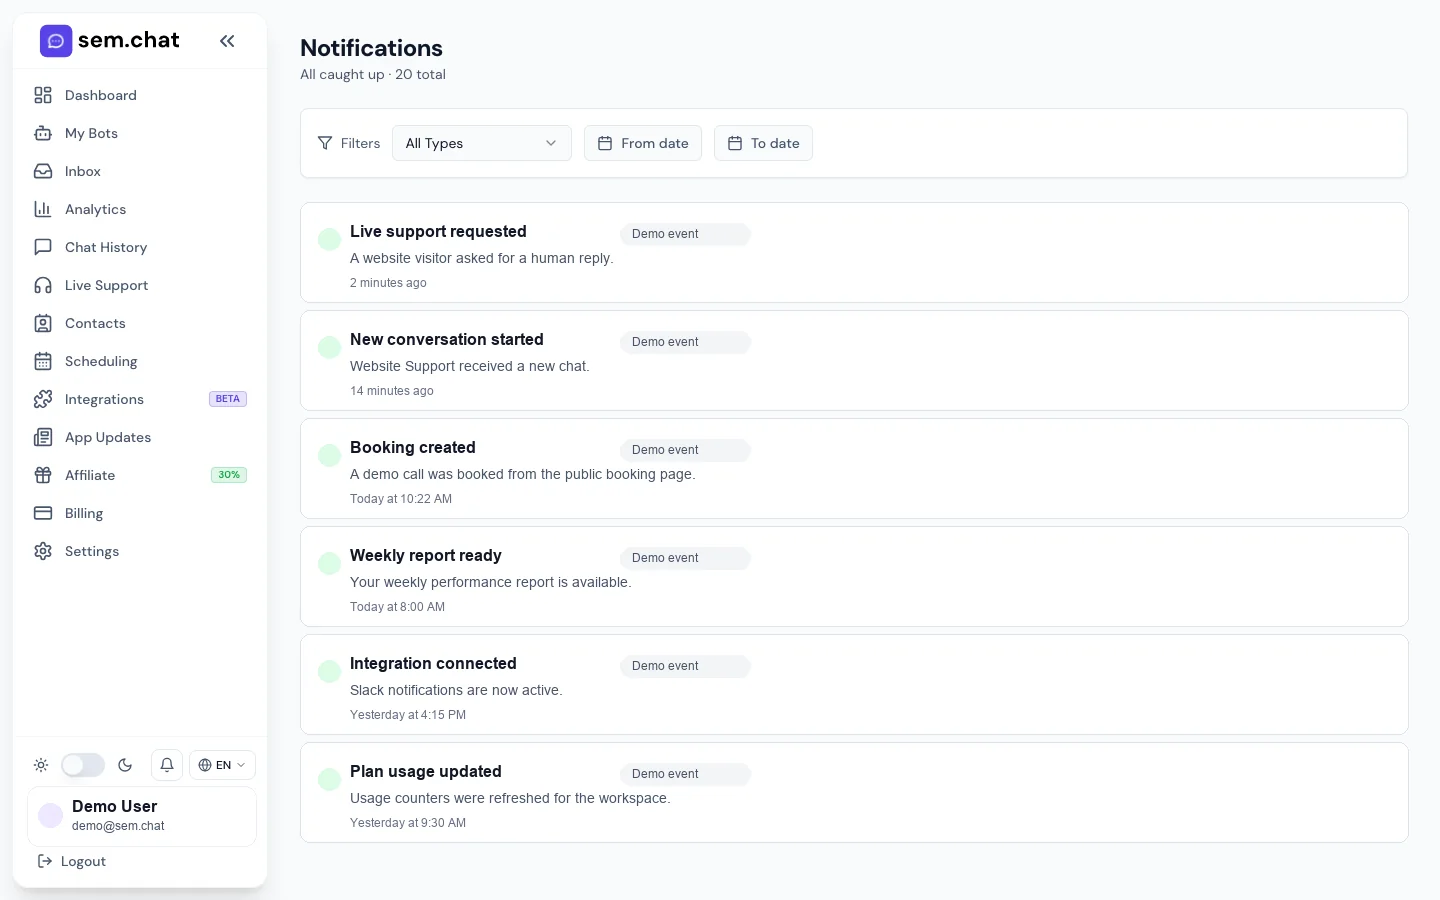
Notifications
Review notifications and act on alerts
What this is for: Use this when the app reports handoffs, billing state, system events, report delivery, or important workspace activity.
Before you start
Make sure notification preferences are set in Settings.
Have live-support coverage if handoff alerts are enabled.
Review unread alerts before marking them read.
1
Open Notifications
Click Notifications in the sidebar or app header notification entry.
Expected result: The notification center lists recent alerts.
2
Filter alerts
Use unread or category filters to focus on billing, live support, bot, report, or system events.
Expected result: Only matching alerts remain visible.
3
Open the related page
Click the alert or use its context to open Billing, Live Support, Reports, or the relevant bot.
Expected result: You act on the notification rather than just reading it.
4
Mark read
Mark a single alert read or use Mark all read after review.
Expected result: Unread count drops and reviewed items are no longer highlighted.
5
Adjust preferences
Open Settings, Notifications if too many or too few alerts arrive.
Expected result: The notification stream matches team needs.
How to test it: Create a safe test event such as a live-support request or instant report, then confirm the notification appears and can be marked read.
Problem
Fix
No notification arrives
Check Settings notification preferences, browser permission, and whether the event actually happened.
Too many alerts
Disable noisy categories or send them only to the responsible team members.
Unread count seems stuck
Refresh the app after marking all read and confirm filters are not hiding unread items.
What to do next: Review App Updates when behavior changes or new controls appear.
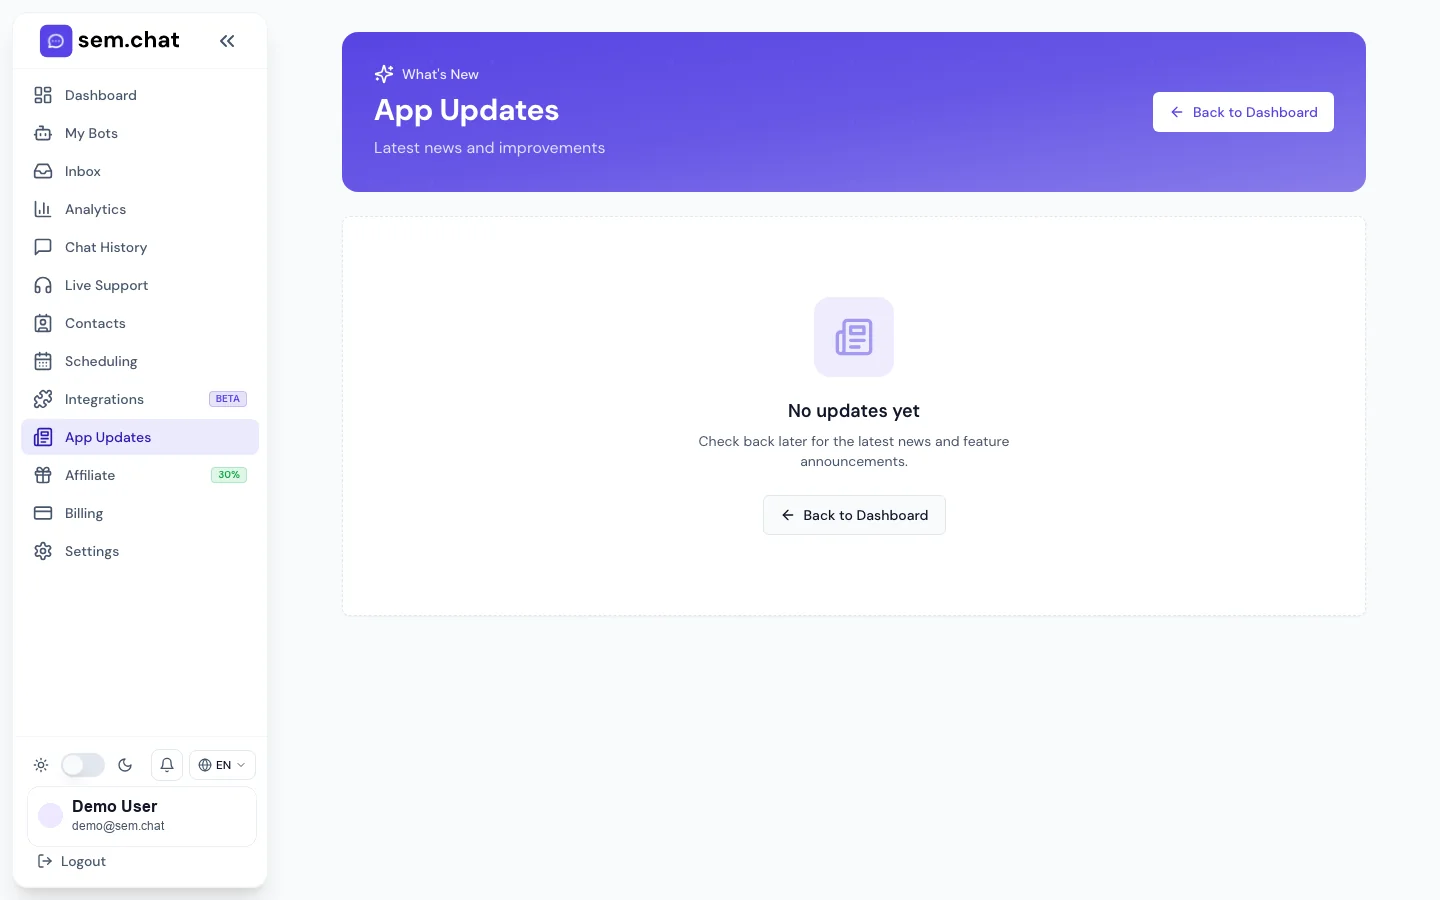
App updates
Use app updates to understand product changes
What this is for: Use this when teammates need to learn what changed before using a new feature.
Before you start
Open updates after major releases or when the UI changes.
Share relevant update notes with support and sales users.
Retest critical workflows after major changes.
1
Open App Updates
Click App Updates in the sidebar.
Expected result: The update feed shows new features, fixes, and release notes.
2
Read the latest update
Open the most recent update card or detail view.
Expected result: You see what changed and which workflow it affects.
3
Map the change to your workflow
Identify whether the update affects bots, widget, support, scheduling, billing, or developers.
Expected result: The right team members know what to check.
4
Retest critical paths
If the update affects a production workflow, repeat the relevant manual steps from this documentation.
Expected result: The team confirms the changed workflow still works.
5
Share internally
Send the update summary to users who own the affected area.
Expected result: Team adoption is smoother and support questions drop.
How to test it: After a relevant update, repeat the guide for the affected feature and confirm screenshots or step names still match.
Problem
Fix
Update mentions a locked feature
Open Billing to confirm whether the current plan includes it.
Team missed a change
Add App Updates review to release or weekly operations routines.
Documentation looks stale after an update
Use the documentation maintenance checklist to update screenshots and steps.
What to do next: Keep the public documentation current as features evolve.
13
Developer Recipes
Generate API keys, use x-api-key authentication, call action-based endpoints, bridge live support to a CRM, register webhooks, verify signatures, and embed the widget in code.
Settings / DevelopersAPI keys, quick start, and usage tabs
1Generate and revoke API keys from the API Keys tab.
2Use Quick Start for first curl examples.
3Review Usage before enabling high-volume automation.
API quick start
Generate an API key and make the first API calls
What this is for: Use this for reporting scripts, custom apps, CRM bridges, external live support, or automation.
Before you start
Use a server-side environment. Do not expose API keys in browser JavaScript.
Generate a separate key for each integration.
Copy the key immediately because secrets are shown once.
1
Open Developers
Open Settings and select Developers, or use the Developers redirect if available.
Expected result: API Keys, Quick Start, Documentation, and Usage tabs are visible.
2
Generate a key
Click Generate Key, give it a clear label, and copy it immediately.
Expected result: The key starts with sk_live_ and is available for server-side requests.
3
Send x-api-key header
Include x-api-key on every public API request.
Expected result: The public API can authenticate the request and scope it to the owner.
4
List bots
Call action=list-bots to find the bot ID you need.
Expected result: The response returns bot IDs, names, active state, and configuration summary.
5
Send a chat message
POST action chat with botId and message.
Expected result: The response returns reply, model, and usage information.
6
Check usage
Call action=usage before running high-volume jobs.
Expected result: You know current plan and usage state before automation runs.
7
Rotate keys when needed
Revoke unused keys and generate new ones for changed vendors or services.
Expected result: Old services cannot continue using stale credentials.
How to test it: Run list-bots and chat from a local terminal or server environment, then confirm the conversation appears in Chat History if chat was sent.
Problem
Fix
401 or unauthorized response
Check x-api-key spelling, copy the full key, and confirm it has not been revoked.
Bot not found
Use list-bots again and confirm the bot belongs to the API key owner.
Browser CORS issue
Move the API call to your backend; API keys are intended for server-side use.
What to do next: Use /api-docs for focused endpoint reference and keep this page as workflow guidance.
List bots
curl -X GET "https://bkpcoudlohqwqunkfclx.supabase.co/functions/v1/public-api?action=list-bots" \
  -H "x-api-key: sk_live_your_key_here"
Send a chat message
curl -X POST "https://bkpcoudlohqwqunkfclx.supabase.co/functions/v1/public-api" \
  -H "x-api-key: sk_live_your_key_here" \
  -H "Content-Type: application/json" \
  -d '{
    "action": "chat",
    "botId": "YOUR_BOT_ID",
    "message": "What can you help me with?"
  }'
Live-support CRM bridge
Poll or push live-support requests into a CRM
What this is for: Use this when agents work in another system but sem.chat receives the visitor conversation.
Before you start
Create a dedicated API key named for the CRM bridge.
Decide whether polling or webhooks fit your infrastructure.
Make sure the CRM stores conversation IDs for future replies/resolution.
1
List waiting handoffs
GET action=live-support-list with status=requested or status=all.
Expected result: The CRM receives open conversations requiring human attention.
2
Fetch messages
GET action=live-support-messages with conversationId.
Expected result: The CRM has full thread context and visitor details.
3
Claim before replying
POST action=live-support-claim.
Expected result: sem.chat marks the conversation as actively handled.
4
Send agent reply
POST action=live-support-reply with conversationId, message, and agentName.
Expected result: The visitor receives the human reply and the thread updates.
5
Resolve or hand back
POST action=live-support-resolve with resolution resolve or hand-back.
Expected result: The conversation leaves the waiting queue or AI resumes control.
6
Log status in CRM
Store the latest handoff status, message ID, and timestamps.
Expected result: CRM and sem.chat remain auditable.
How to test it: Create a safe handoff, mirror it to the CRM, reply from the bridge, and confirm the visitor thread updates.
Problem
Fix
Duplicate CRM tickets
Use conversationId as the idempotency key in your CRM bridge.
Replies arrive out of order
Store message timestamps and avoid concurrent replies from multiple systems.
AI replies while agent is working
Claim the handoff first and only hand back when the agent is done.
What to do next: Register webhooks if polling is too slow or too expensive.
Webhooks
Register webhooks and verify X-SemChat-Signature
What this is for: Use this when your system needs real-time events for handoffs, messages, and resolution updates.
Before you start
Webhook URL must be HTTPS and reachable from the public internet.
Store the webhook secret immediately; it is shown once.
Verify signatures before processing events.
1
Register the webhook
POST action webhook-register with url and events.
Expected result: The response includes webhook details and a one-time signing secret.
2
Store the secret
Save the secret in your server environment or secret manager.
Expected result: Future deliveries can be verified.
3
Verify signature
Read X-SemChat-Signature and compare it to an HMAC SHA-256 over the raw request body.
Expected result: Only genuine sem.chat deliveries are accepted.
4
Handle retries idempotently
Use event ID or conversation/message ID to avoid duplicate processing.
Expected result: Retries do not create duplicate CRM records.
5
List webhooks
GET action webhook-list to audit configured endpoints.
Expected result: You can see URLs, events, enabled state, and recent delivery state.
6
Delete stale webhooks
POST action webhook-delete with webhook ID.
Expected result: Old endpoints stop receiving events.
How to test it: Register a test endpoint, trigger a live-support event, verify the signature, and confirm your handler returns 2xx.
Problem
Fix
Signature does not match
Use the raw body, not parsed JSON, and confirm the correct webhook secret.
Webhook receives no events
Confirm the event list includes the event you are testing and the endpoint is HTTPS.
Webhook times out
Acknowledge quickly and process long work asynchronously.
What to do next: Link engineers to /api-docs for endpoint details and examples.
 Signup and onboarding
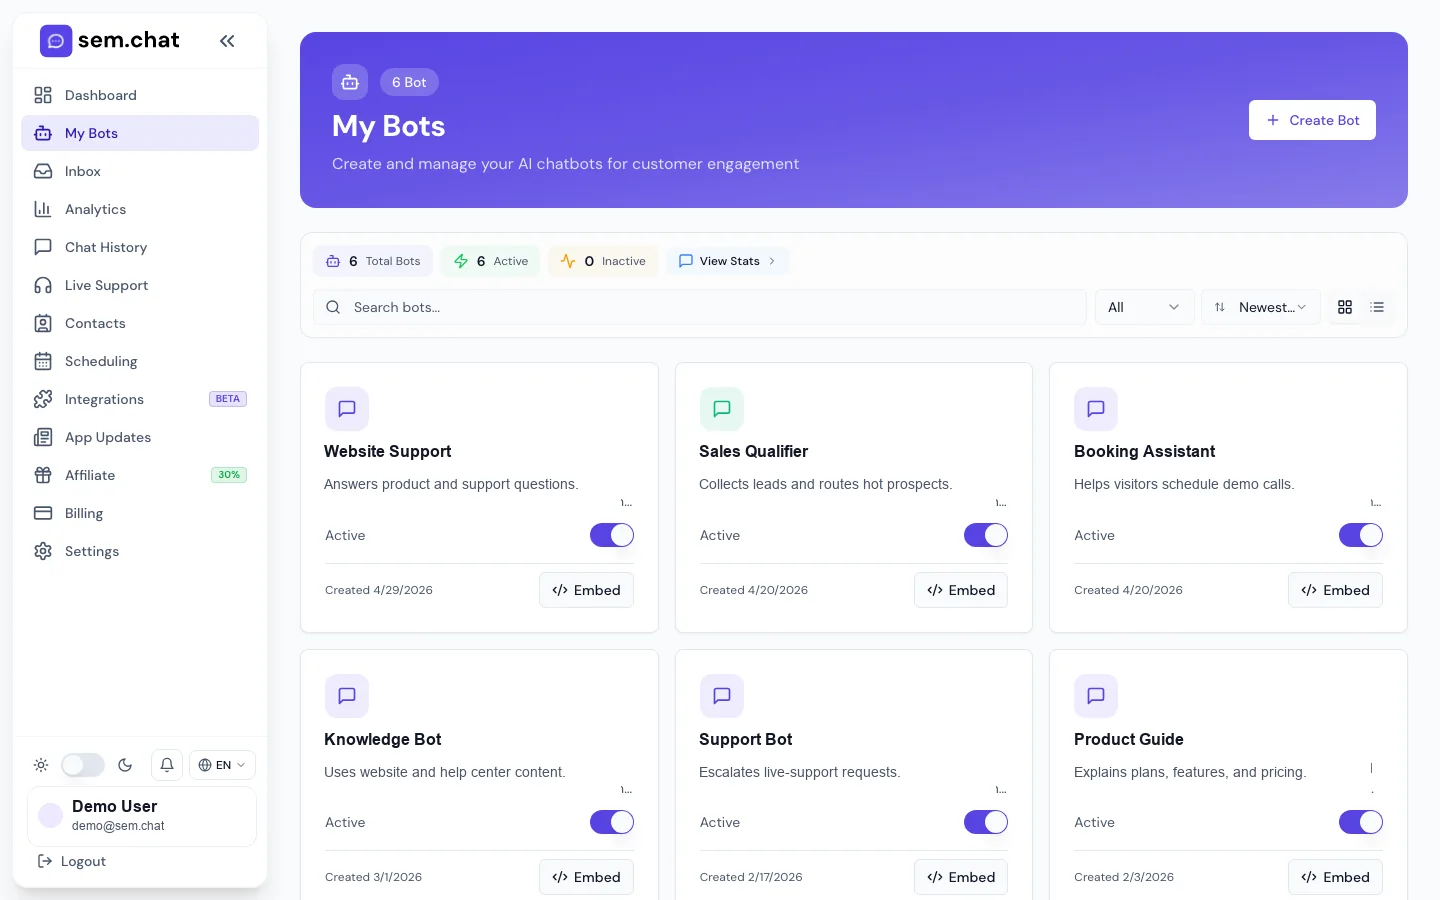 Bots and Bot Builder
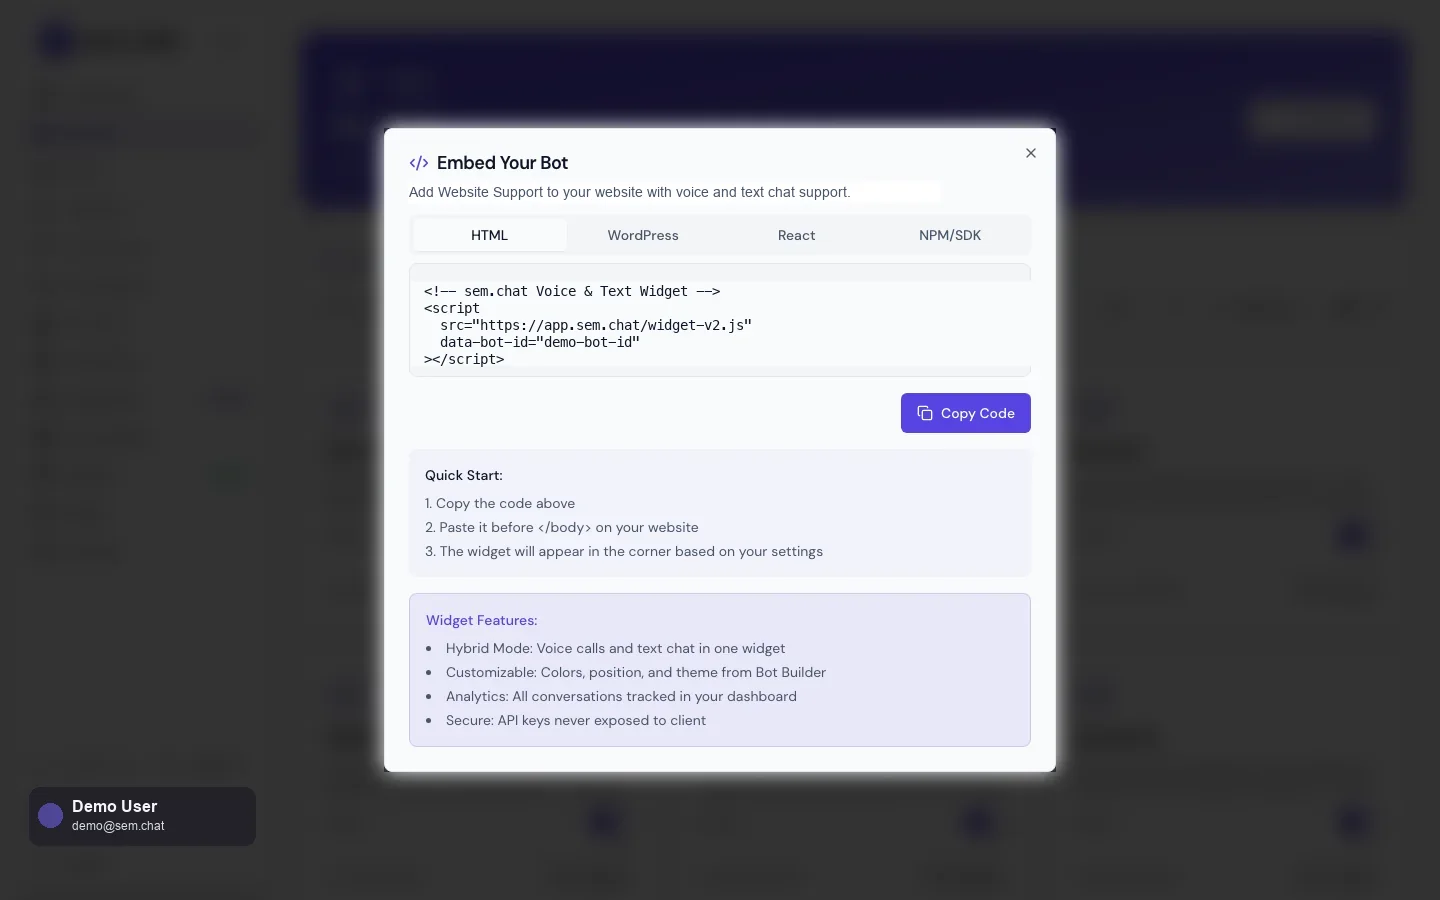 Widget installation
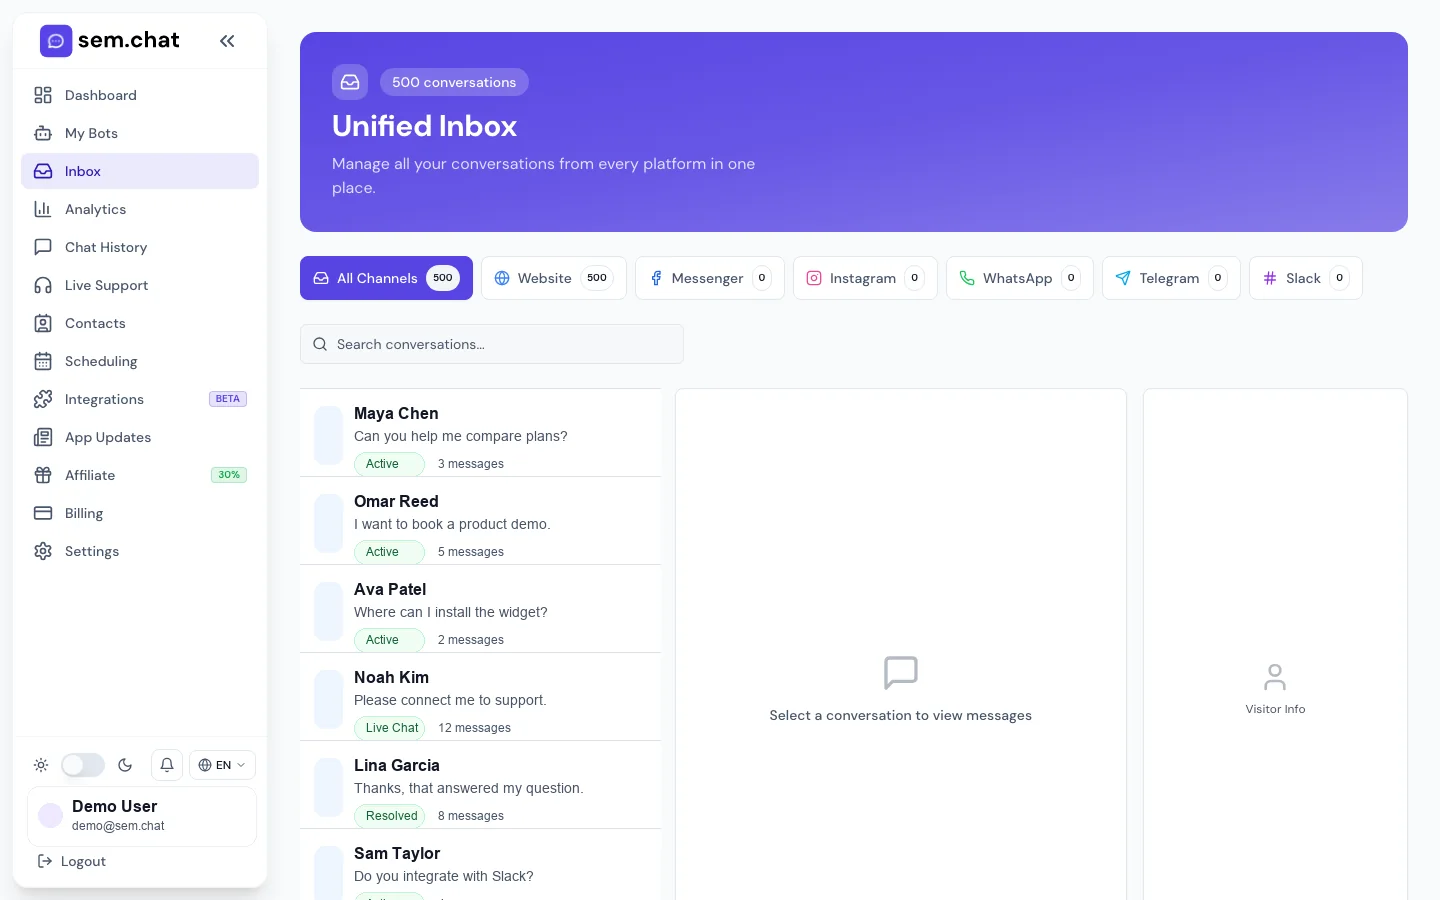 Operations
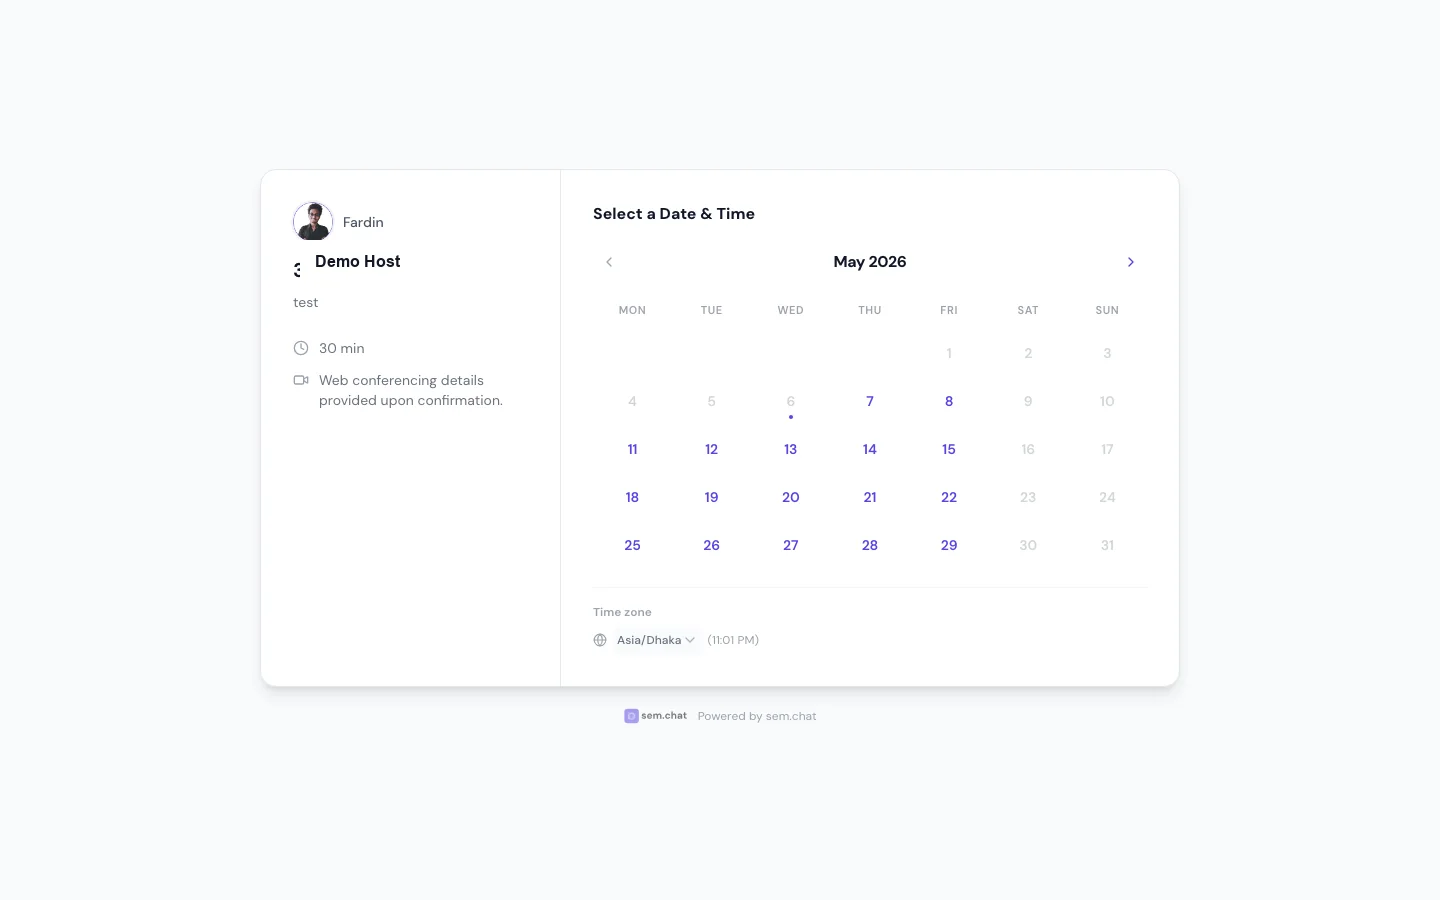 Scheduling
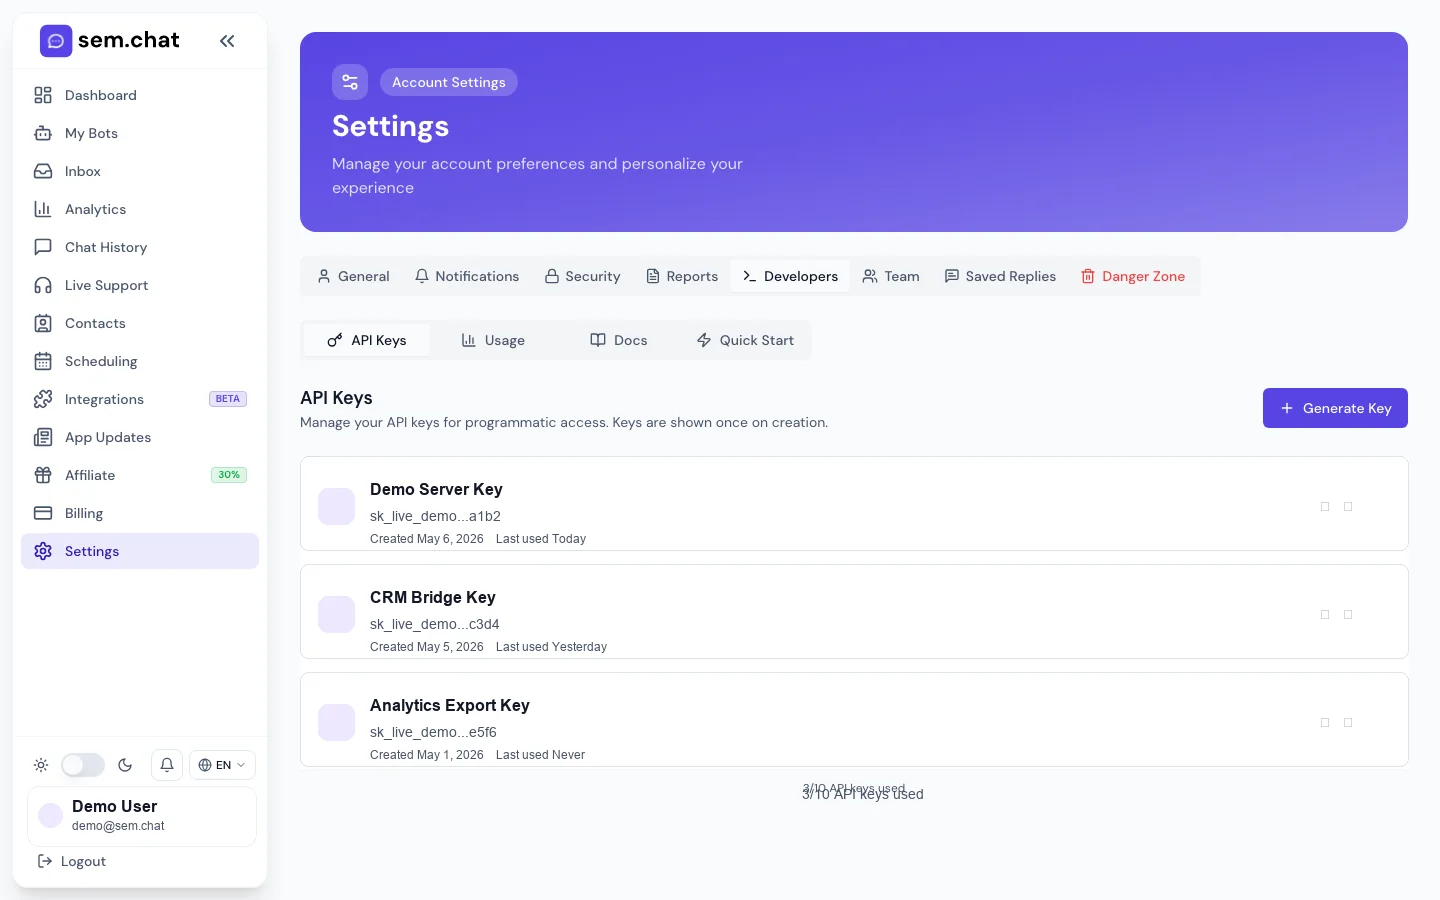 Developers